Imagine having an AI version of yourself, ready 24/7 to engage, coach, and support your clients, team, and users.
Now with Knorish Flow AI, create your own AI powered Thought Avatar trained on your unique content. Go beyond traditional content and offer a personalized, interactive experience whenever your users need it.
Covered in this article
- What Is Knorish Flow AI
- How to Setup Knorish Flow AI on Your Account?
- How To Automate Knorish Flow AI's Training On Your Knorish?
- Understanding Automated Training Data
- How To Delete or Remove Trained Data
What Is Knorish Flow AI
Knorish Flow AI automates learner support for you 24/7. So whether you have a few learners, teams or partners or 10,000, the AI automatically helps you scale your support, engagement, and learning experiences from your website.
Knorish Flow AI is not just a feature; it's a game-changer. This innovative tool offers a range of benefits that can transform the way you interact with your audience:
- Scalability of Services: As your audience grows, the AI Thought Avatar effortlessly manages large query volumes without sacrificing quality or personalization.
- Enhanced Learning Experience for Users: The AI Thought Avatar serves as a 24/7 mentor, offering instant responses, supplementary learning materials, and personalized guidance, enriching the learning experience.
- Consistent Quality of Interaction: The AI Thought Avatar ensures consistent, personalized, and thoughtful responses in your style and quality.
- Reduce Repetitive Work: Let the AI Thought Avatar handle repetitive queries, freeing your time for more complex and creative tasks.
How To Setup Your Thought Avatar On Your Knorish Account?
Setting up your thought avatar on Knorish is very easy and gets done in just a few steps. Customize your digital presence effortlessly with this simple setup guide.
First upload the course content which Knorish Flow AI will consume instantly and build an understanding of the content. Here's how
- Login to your Knorish Account
- Upload diverse content in your courses
- You can upload
- PDFs or
- Build custom pages using page builder.
Set up and personalize your unique Thought Avatar using Knorish Flow AI
Here's how you setup the customizations for your thought avatar using the Knorish flow AI.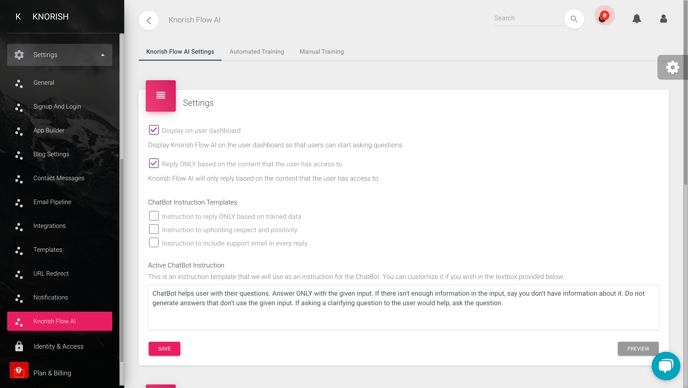
- Access Knorish Flow AI under Settings
- Under Knorish Flow AI Settings, select Display on user dashboard
- Select your custom ChatBot Instruction Templates. Choose from:
- Instruction to reply ONLY based on trained data
- Instruction to upholding respect and positivity
- Instruction to include support email in every reply
- Add your custom Active Chatbot Instructions.
- You could use a template such as Chatbot helps user with their questions. Answer ONLY with the given input. If there isn't enough information in the input, say you don't have information about it. Do not generate answers that don't use the given input. If asking a clarifying question to the user would help, ask the question.
- Click on Save

- Under Greetings, Add the Greeting message title and a short message description
- Click on Save
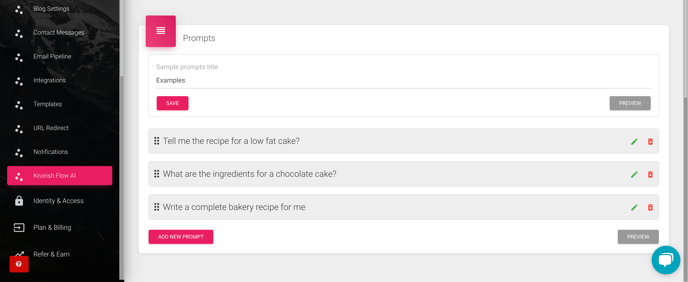
- Under Prompts, list sample prompts that will reflect on the users Dashboard Screen
-
- Click on Add Prompt
- Add prompt text in the Enter the prompt section
- Click on Save
- At each step, you can also click on Preview to view how the Flow AI will look like for your users.
How To Automate Knorish Flow AI's Training On Your Knorish
Automating Knorish Flow AI's training on your Knorish account is seamless as well. Here's how to do this on your account.
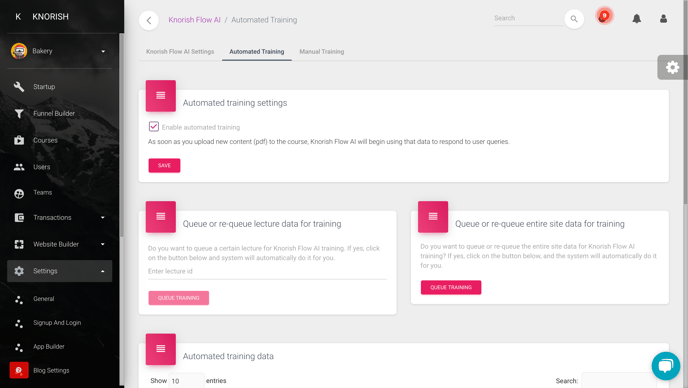
- Access Automated Training Section in Knorish Flow AI
- Enable automated training. This is turned on by default.
- Finally, select Queue or re-queue entire site data for training
Understanding Automated Training Data
In the next section, we delve into understanding Automated Training Data, a pivotal aspect in optimizing AI understanding of your content. Learn how various content types are processed, decode essential terminology, and harness the power of data-driven customization for your digital presence.
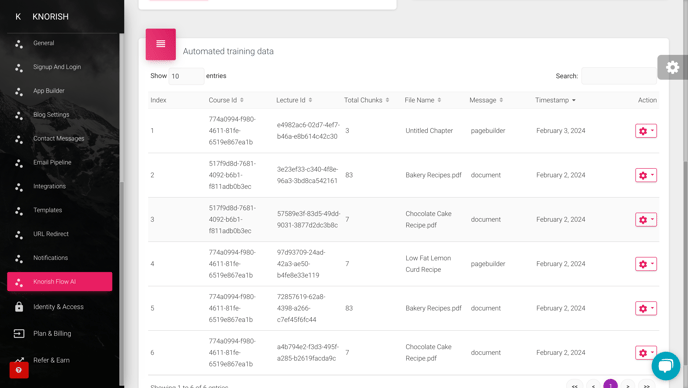
"Automated training data" refers to the process where the AI system learns from the content provided, to accurately mimic your style and provide relevant responses. The data used for this training is organized and tracked with specific elements. Here's an explanation of each element:
- Course ID: This is a unique identifier for the course from which the content is being used for training the AI. It helps in distinguishing between different courses you might have uploaded, ensuring the AI learns from the correct set of data.
- Lecture ID: Similar to the Course ID, this is a unique identifier for each lecture or module within a course. This distinction allows the AI to understand and learn from the specific content of individual lectures, enhancing its ability to provide contextually relevant responses.
- Total Chunks: This refers to the number of segments or 'chunks' the lecture or course material has been divided into for the training process. Breaking down the content into smaller parts can make it easier for the AI to process and learn from the information.
- File Name: This represents the name of the file containing the content used for training. It could be a PDF, or any other format supported by the system. The file name helps in organizing and referencing the content during and after the training process.
- Message: This likely refers to a summary or description of the content within each chunk or file. It serves as a quick reference to understand what each part of the training data contains, facilitating easier management and review of the training process.
- Timestamp: This is a record of the exact date and time when the particular piece of content was lined up for training the AI. This information is crucial for tracking the progress of the training process, managing updates to the content, and ensuring that the most recent and relevant data is being used for training the AI.
These elements collectively ensure that the training of the AI Thought Avatar is organized, efficient, and tailored to the specific content and style of the creator. They help in monitoring and managing the training process, making sure that the AI learns accurately and effectively from the provided material.
How To Delete or Remove Trained Data
There could be situations where in you need to update content or remove it as it may have become obsolete. in such cases, to update the Thought Avatar with new content, please follow the steps listed below:
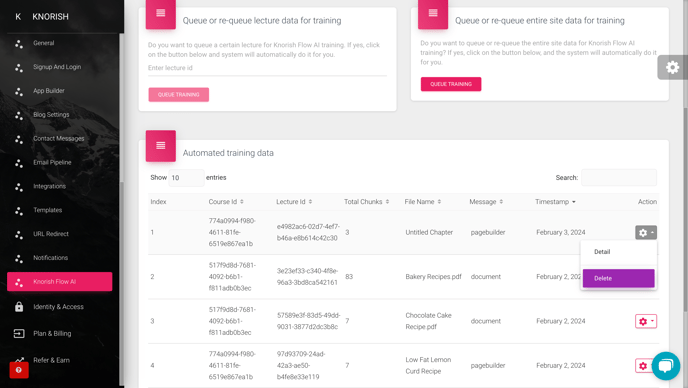
- Under Automated Training Data.
- Click on the settings icon next to the content which needs to be checked.
- Select Detail to learn more about the content highlighted.
- Select Delete to remove the content from the automated training data.
- Click on Yes, Delete It to confirm selection.
Important Considerations
- The Knorish Flow AI is an intelligent AI that can understand the context of the question. While answering questions, it would refer to your content and respond from that.
- Adding the instruction - Instruction to reply ONLY based on trained data, will ensure the AI doesn’t answer beyond what's included in the course content that the user has access to. Leave this option unselected if you wish the AI to go beyond the available content and accordingly respond to the questions.
- Please read carefully before adding the custom instructions as the AI's behavior could change accordingly. You can only select one option at a time, however you can also add custom instructions beyond that to customize the thought avatar's behavior.
- AI training is automatic. Most content is added, consumed and ready for usage within minutes however there could be instances of delay depending on the volume of content pieces being added. Expect rare delays of up to 15 minutes in such instances.
- To update responses, simply add or update the course content and the AI will be trained automatically if automated training is enabled. Else you can also click on Queue or re-queue lecture data for training by entering the specific lecture ID.