Create stunning web and landing pages with animations, AI and tons of different designs effortlessly. No coding skills needed.
The Knorish page builder offers a wide variety of options for quickly designing and launching your web pages for your courses, webinars, ebooks, lead generation and website as well.
With a simple drag and drop interface, you will be able to design amazing landing pages. Its most striking feature is its simplicity and ease of use, allowing anyone, regardless of their technical background, to create professional-looking pages.
Plus, the integration of AI-based capabilities for text regeneration ensures not only aesthetic appeal but also high content quality. In this article, we will show you how to access and use the page builder to create your pages for your knorish site.
Note: Currently the new page builder is available for designing any new page and editing new pages built using this version. Additionally, new website themes have been launched as well however, existing website themes and pages built using the old page builder would continue to remain as is and would still be editable using the older version.
How To Create A Page Using The New Page Builder (V3)
- Accessing the Knorish Page Builder
- Choosing A Page Template
- How To Use The New Page Builder To Edit A Page
Accessing the Knorish Page Builder
Getting started with the Knorish page builder is straightforward and user-friendly. Here's how you can access it:
Via Publisher Dashboard
- Head to the Publisher Dashboard
- Click on Website Builder
- Select Pages
- Choose New Page
- Opt from the Landing Pages available to start designing.
Note: Since this is a new revamped page builder, legacy pages built on the older version will still have the older version of the page builder
Through Courses Section
- Navigate to the Courses section.
- Create a New Course Or access existing one by selecting Builder.
- Select Landing Page on the top
- Choose a template to start your landing page project.
Choosing A Page Template
There are several types of templates available in the landing page templates such as Ebook, Courses, Webinars, lead generation, one page sites and more.
After you have reached the landing page section in the course, or clicked on new page in pages, follow the steps below:
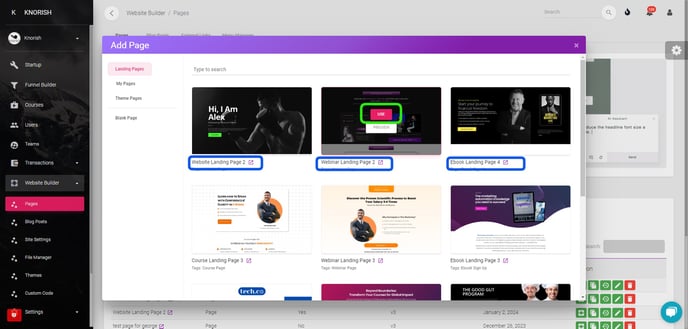
- Select a landing page available from the list
- Click on the Open In A New Tab Icon (
 ) to review the page before installing it.
 - Click on Use to install the page
- Click OK on the success message pop up.
- The page design will be installed instantly
- The name of the page will be the name of the template chosen.
IMP: Pages built using the website themes built on the older version will continue to work as is. Hence, selecting My Pages or Theme Pages will initiate the older version of the page builder in such cases.
How to customize Pages from the website builder using the New Page Builder?
After the new page is installed, click on the ‘Edit With Visual Builder’ option to enter the landing page edit mode. Additionally, here's how different elements of the page can be customized:
- Change Background Image
- Add A New Section On The Page
- Change Font For The Page or a Block
- Add A New Header In A Section
- Add Or Change A Block On The Page
- Add Navigation/ Menu For The Page
- Adding Animations To Buttons or Sections
- How To Edit & Create Animated Buttons And Connect The Buttons With CTA - Signups, & Logins
Note: Videos below this section are screen grab videos, without audio.
Change Background Image
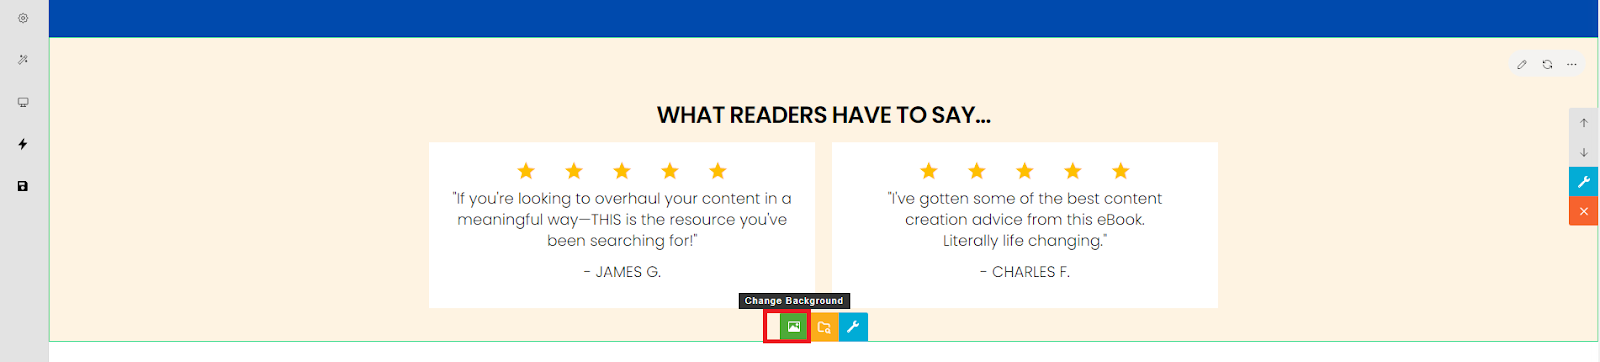
- Simply, click on the camera icon button, select the image from your PC/laptop and click 'ok'.
- Click On Save Icon On the left panel to save your changes.
Note: Please select an image up to 1MB size maximum to ensure that the page does not become too heavy, else page loading speeds will be impacted causing issue for users and impact SEO as well.
Add A New Section On The Page
- Click on the + sign to access the panel
- Choose the section type that you want
- Basic
- Slider
- Header
- Article
- Photos
- Video
- Dynamic Sections
- Click on the section you like
- Make changes, update images, font or text as needed
- Check in Preview on the left to view how the page will look like
- Once ready, click on save!
Change Font For The Page or a specific Block
Changing the font for the entire page is super easy and happens in one click
- Click ‘Typography’ on the left panel
- Under Apply To, select Page
- Select the font style that you like
- The font style for the heading, subheadings and the text on the entire page will be changed automatically.
- Click On Save Icon On the left panel to save your changes.
Changing Font For One Block
- Select the text for which you want to change the font
- Click ‘Typography’ on the left panel
- Under Apply To, Select Section
- Select the font style that you like
- The font style for the heading, subheadings and the text on this entire block will be changed automatically.
- Click On Save Icon On the left panel to save your changes.
Add A New Header In A Section
- To add a new header in a section, simply the block you need in its place from the ‘+’ (Sections) icon.
- Click on ‘Header’ to choose the one you like.
- After the header is placed, select the Up or Down buttons (on the right) to place it in the right place.
- Click On Save Icon On the left panel to save your changes.
Add Or Change A Block On The Page
- To add or change a block on the section, click on the blocks icon on the left.
- Choose a block from the list.
- Drag and drop it in the section where needed.
- Then delete the additional blocks
- Update text as needed by double clicking on the text.
- Click On Save Icon On the left panel to save your changes.
Add Navigation/ Menu For The Page
Create a unique page navigation menu for your pages with these simple steps. The video above show to create a menu, add logos, and manage the navigation. Here's how to add navigation and edit the menu on the page.
Adding A Menu & Logo On The Menu
- Click on the + sign to access the panel
- Select Dynamic Sections
- Choose Nav Bar for menu
- Click on Replace to install the new default menu
- Click on the purple settings icon in the section
- Under Settings, Select ‘Style’ and choose the menu scroll style that you prefer
- Upload a Logo if needed by clicking on the logo button.
- Untick Circle if you don’t wish the logo image to be circular in size
- You can also add a background color and sub menu background color to the text on the menu to make it more appealing.
Adding Links On The Menu
- To Update Menu Items, select MENU BUILDER
- Under ‘ Generate Link’, select Type of link
- Under Source – select the page name
- Update the display text
- Select ‘Open New Window’ if you want the click to open the link on a new tab
- Add an icon should you wish
- Click Add
- Repeat the process as needed
Note:
- Under Type of link, you can select page links, account links, course checkout links and bundle checkout links
- Page Links - Will show all the published pages available on the site
- Account links - Login, signup, cart, and forgot password
- Course Checkout Links - will redirect to the direct sign up page for the specific course chosen
- Bundle Checkout Links - will redirect to the direct sign up page for the specific bundle chosen
- To enable a drop down option on the menu, once the menu options are set, click and drag the items under the main category to enable a drop down menu.
Adding Animations To Buttons or Sections
Add another level of interactivity to your pages with Section or button based animations. Here’s how.
How to add animation to a Button
Adding animations to the buttons specifically for landing pages help drive more attention towards the call to action. Here’s how to implement it:
- Click on the button where animation needs to be added
- Click on Animation on the left panel.
- From the Animation panel on the right side, select element
- Under ‘On View’, Select an animation that you want:
- Slide - Left, Right, Up, Down
- Flip - Horizontal, Vertical
- Zoom - In, Out
- Pulse
- Bounce
- Under On Scroll or Timeline, you can also choose from the choice of animation options available to customize the look and feel of the buttons on the page.
How to add animation to a section
- Click on the section where animation needs to be added
- Click on Animation on the left panel.
- From the Animation panel on the right side, choose from the list of animations available
- Save the page to update changes.
How To Edit Button Design & Connect Them With CTA - Signups, & Logins
One of the most important parts in designing a page is to ensure the buttons have the right CTA text and are connected to the right links. Here’s how to do this.
Editing Button Design
- Click on the button that needs to be edited
- Click on the ‘Edit Button’ icon to change the look of the button such as background or text color, width, border color or thickness, padding, border radius, and margins.
- Then select Hover to change the background color, text color, and the border color, when the mouse hovers on the buttons.
- Under Text, you can change the font size, letter spacing, change the letter case to upper or lower or underline it.
- Additionally, you can save the button design under saved for future uses or simply access the templates for sample designs.
Adding Links To A Button
- Click on the button that needs to be edited
- Click on Link to add the link
- You can choose from
- Page Links - To redirect a user to another page
- Account Links - For Login, signup, cart and forgot password
- Course Checkout Links - will redirect to the direct sign up page for the specific course chosen
- Bundle Checkout Links - will redirect to the direct sign up page for the specific bundle chosen
- For redirection to another page, under Source in Page Link, Select the page name
- For sign ups on Courses or bundles, under Source in Page Link, Select the course or bundle name
- Edit the Text to change the button text.
- Click OK
Important Considerations
- Please upload images under 1 MB size to ensure fast page loading speeds
- Once the page has been designed, please ensure to connect the buttons with the requisite pages or sign up options.