This post will help you understand what is Single Sign-On and how you can take advantage of this feature on your Knorish site.
Single Sign On (SSO) is a feature that enables users to sign in to the Knorish site without re-typing their password again. This means that an external site redirects the user to the Knorish site. After that, the Knorish site will automatically log the user in.
> This is an advanced feature and should be used by experienced developers only. Bad usage or improper implementation of this feature can lead to and allow access to unauthorized users.
> This feature is only built to authenticate learners. Other users such as Knorish site admin or any IAM user would not be able to use this feature. They always need to log in using the standard login page: https://yoursite.Knorish.com/account/login page.
> Additionally, please note that due to the technicalities involved in the external applications, Knorish support teams will not be able to support beyond this FAQ.
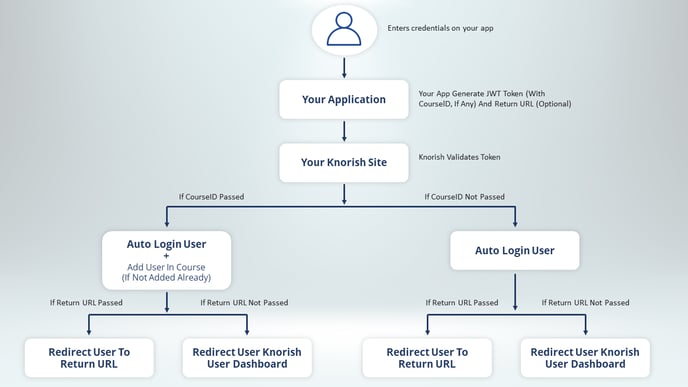
How does this feature work?
This is achieved by an end-to-end encrypted JWT token. To generate this token in your website/ app you need to generate an app key and a secret on your Knorish site. And then use this key and secret to create an encrypted JWT token.
A user will sign in on an external website/ app and the developer of that website/ app will redirect that user using the encrypted JWT token. When the Knorish site receives the JWT token, it would decrypt it using the secret and validate the user identity. If found correct, the user gets authenticated.
How to generate a JWT token on jwt.io (or in your app)?
You could use https://jwt.io to build or debug the JWT token very easily. You first need to generate an app key and a secret on your Knorish site dashboard, refer to the below .gif to generate it.
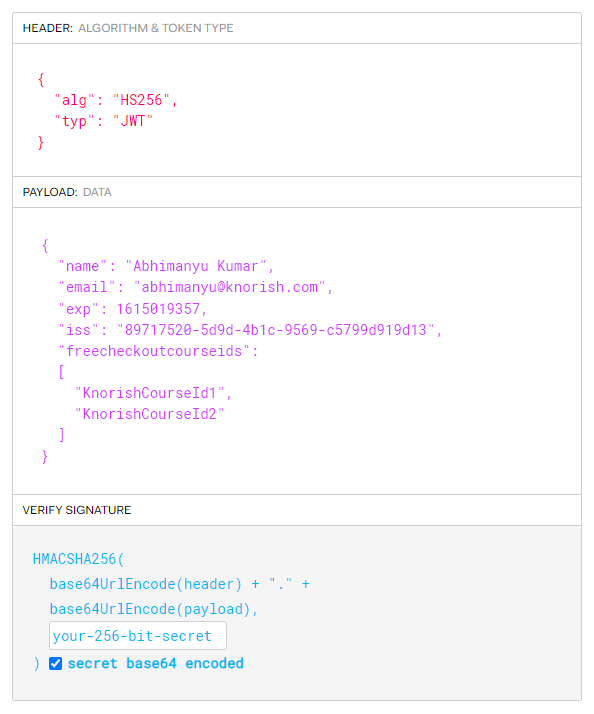
Once you have the app key and the secret, you can use https://jwt.io to build a sample token. Refer to the screenshot below where a sample payload (data) is being used to generate a token.
Now, let's understand what are the required and optional datas:
HEADER (Algorithm and token type)
- "alg": "HS256" - This is required.
- "typ": "JWT" - This is required.
PAYLOAD (Data)
- "name": "user full name" - This is required.
- "email": "youruseremail@domain.com" - This is required.
- "exp": expiration_datetime_in_seconds_since_unix_epoch - This is required. It should be a future date time in Unix epoch format, you could use https://www.epochconverter.com to generate epoch timestamp.
- "iss": "app_key_generated_on_Knorish_site" - This is required.
- "freecheckoutcourseids": ["KnorishCourseId1", "KnorishCourseId2"] - This is optional.
Note: When you want to give the course access to a user, you can pass the course id (as an array) in the payload. Remember, it is your responsibility to send the correct user identity and course id, Knorish will just add them to that course (if not added already). If the user is just logging-in then you should not pass freecheckoutcourseids in the payload.
VERIFY SIGNATURE
- your-256-bit-secret - This is required, you can generate this secret on the Knorish site.
- checkbox checked 'secret base64 encode' - This is required.
Which URL to use for JWT token authentication?
The URL is going to be your Knorish site URL. Here's a sample URL:
GET : https://yoursite.Knorish.com/singlesignon/jwt?token={token_generated_on_jwt.io_or_on_your_app}
How to use the JWT token to authenticate the user?
This is one of the simplest tasks, just use your browser to access your Knorish site. In the below example replace 'token_generated_on_jwt.io_or_on_your_app' with your token. This will automatically authenticate your user.
https://yoursite.Knorish.com/singlesignon/jwt?token={token_generated_on_jwt.io_or_on_your_app}

How to use a JWT token to authenticate a user and assign a course?
For this, you need to pass freecheckoutcourseids in JWT token payload. You can copy the course id from your Knorish site > dashboard > course page > browser address bar will have course id. Now use this course id in the payload.

How to play the course immediately after the user logs in?
To use this feature you need to send token and returnurl with GET request, for example, if the course id is "56a87049-7e02-4891-ad46-5b4fb73b63fb" full GET request would look like:
GET : https://yoursite.Knorish.com/singlesignon/jwt?token={token_generated_on_jwt.io_or_on_your_app}&returnurl=https://yoursite.Knorish.com/course/play/56a87049-7e02-4891-ad46-5b4fb73b63fb
Note: Since you are redirecting to the course play page, you must ensure that, either this user was earlier added in the course or freecheckoutcourseids could be part of this request as well.
How to redirect to another page immediately after the user logs in?
To use this feature you need to send token and returnurl with GET request, for example, if the page URL is "https://yoursite.Knorish.com/page/thank-you", full GET request would look like:
GET : https://yoursite.Knorish.com/singlesignon/jwt?token={token_generated_on_jwt.io_or_on_your_app}&returnurl=https://yoursite.Knorish.com/page/thank-you
How about your Knorish site visitor?
By design, your Knorish site is accessible for every visitor, but because you are using SSO you might not need the Knorish site to handle visitor traffic. You can handle this in two ways on Knorish:
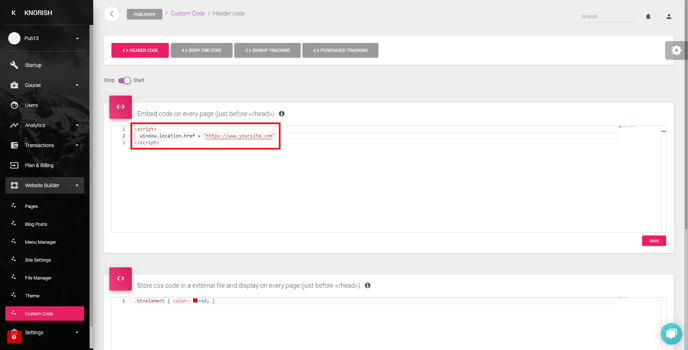
1. Redirect all Knorish site traffic to your site
You can take advantage of our custom code to redirect your visitors, refer to the screenshot below:
2. Hide the menu bar on your Knorish site
You can hide the menu bar from your Knorish site so that any visitor would not be able to login or signup, refer to the screenshot below:
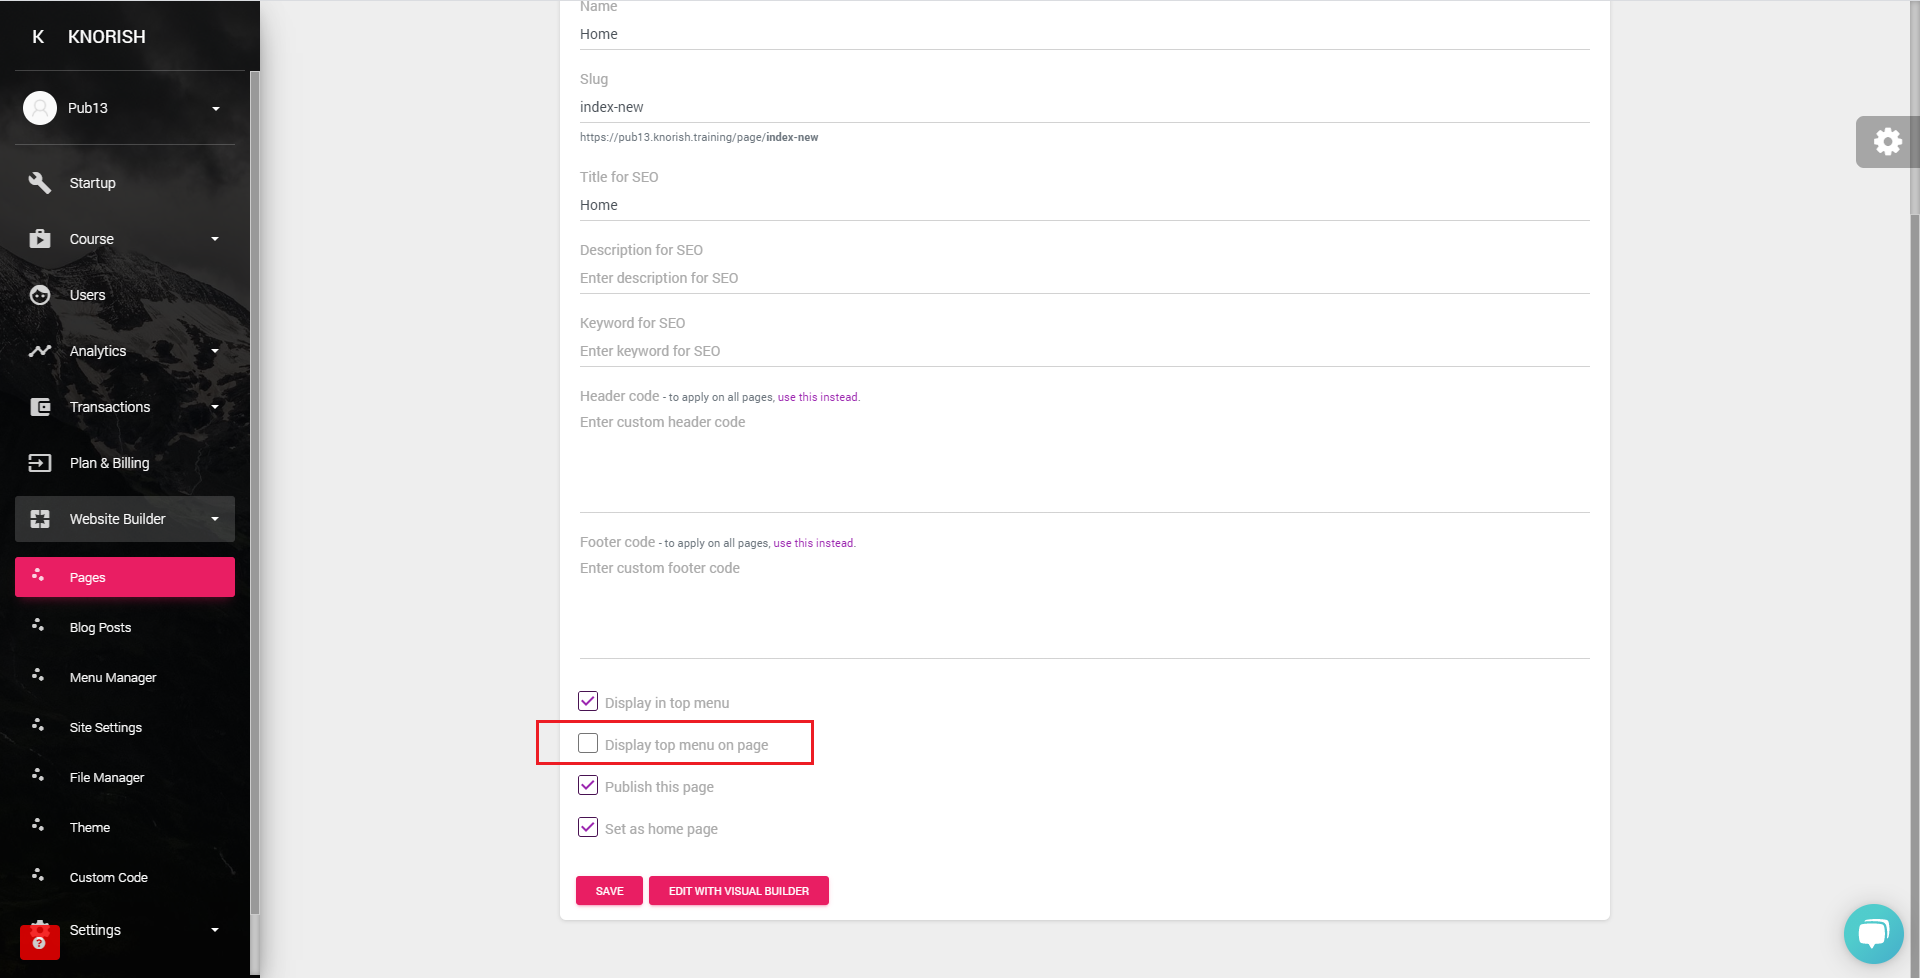
Note: This menu switch off has to be enabled on every page where you wish to hide the menu
How to handle errors?
The Knorish site will only handle GET requests for SSO and then validate the token. In case, anything goes wrong, you will see a friendly error message in the browser address bar after the # symbol.
Frequently Asked Questions
- Is there an upper limit on the length of payload on how many course ids can be accommodated?
There is no limit as such from our end, but because the token is being transferred through a query string (browser URL), browser URL length restriction will apply (that is 2048 characters in chrome). Our recommendation would be to send max 5 courses in the payload.
- Once the user purchases a course and does not visit the LMS immediately, what is the mechanism/API by which we can update Knorish of the purchase. Any webhook or batch that can be used for the same?
Once you generate a token, you can hack it by making a server-side http request with a token. But we recommend users redirect after a successful purchase.
- We were not able to find which course id field to use while sending in the token. Can you please update on the same?

- We noticed that when we send an invalid course id, it breaks the flow. What is the exception handling mechanism?
You should not send an invalid course id, double-check it, store it accurately in your backend. Because this is an http redirect, we can't give you an exception or error code in response.