Contact us forms are a great way to interact with your customers and answer their queries. In this article, we will show you how to create a contact us form and check for queries submitted via the form.
Contact Forms section can be added on any page. Once the page is published, when someone submits the form, the information will be updated under Contact Messages.
You can also route the information to Freshdesk CRM as well. Learn more about how to integrate Freshdesk here: Freshdesk Integration
If Freshdesk is connected, the contact messages will only be routed to Freshdesk and will not be visible on Contact Messages page.
How to use the contact form to create a Contact Us page
There are 2 methods to create the contact us page with a form on it. Using the new page builder or via the older page builder.
- Using The New Page Builder
- Using The Old Page Builder
- How to check for queries raised by a prospective customer through this and respond to them?
Using The New Page Builder
- To enable the form, login to your account dashboard. Click on the Website Builder and select the ‘Pages’ option in the builder.
- To create a contact Us page, select ‘New Page’.
- Select blank page, and then type in the name of the page.
- Ensure to leave the New Page Builder Tab on.
- Enter the page details such as Page name, page title, slug, description and keywords for SEO.
- Select the options as applicable on the page.
- Select Publish the page. Save the page. And then click on Edit With Visual Builder
- Delete the existing template content
- Under All Categories, Select Contact and choose an option from the list
- Add a header and other sections as the need be. Adjust settings, and update text
- Click on Save to save the changes.
- Submit a test message to check if the messages are being saved
Note:
1. As you build the page, you can also click on Live Preview to view how the page will appear on different device sizes
2. All submitted messages are stored in Contact Messages under Dashboard in Settings. You can click on the reply (email) icon to reply to the messages directly.
3. Please note that these responses will be sent from noreply@knorishmails.com and are not monitored.
4. Feel free to connect FreshDesk to get all messages stored and responded to, from the Freshdesk CRM. Learn more about how to integrate Freshdesk here: Freshdesk Integration
Using The Old Page Builder
- To enable the form, login to your account dashboard. Click on the Website Builder and select the ‘Pages’ option in the builder.
- To create a contact Us page, select ‘New Page’
- On the next screen, complete the page details. Since the new page will be a contact us form, type in the name of the page accordingly.
- Scroll down to select a template for this page. You can also use a blank page as well should you wish. For the purpose of this FAQ, a blank page was used by clicking on ‘Start Empty’.
- Then select the options at the bottom of the page as the case may be. Once saved, a “Success” popup will appear on the screen and clicking “Ok” will successfully create the page.
- Now head to the “Menu Manager” section in the Website Builder. You will be able to see that the “Contact Us” page is created but will be on the top of the screen. Click and drag the green button before Contact Us to a position you find suitable. And click the Save button.
- Once done, in the pages section, you need to click on the 1st button in the “Actions” column for the Contact Us Page. This button shows Edit in Builder, as now we need to edit the form we created for the user.
- Clicking this button will lead you to the Website Editor.
- Here you can see the Contact Us form section available under +Sections. Select this section to see how this will look from the viewers' perspective. Click on Save to get this form up and running
How to check for queries raised by a prospective customer through this and respond to them
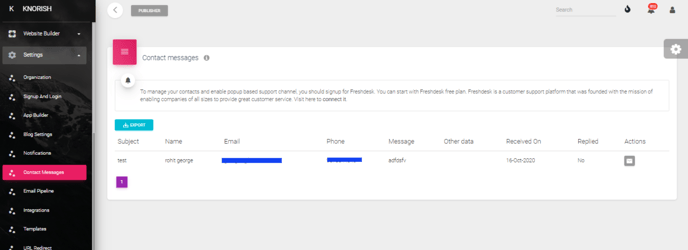
- To check the messages received by the clients head to the settings section in the Dashboard of your course website as shown above and click on “Contact Messages”.
- On the Contact Messages Page, you can reply to the messages via email. You can use the Reply Button or can directly look at the message from the Notification feature on the Dashboard.
- By opening the notifications you will see the new message that has popped up. Clicking on view will take you to the Contact Message page.
- Now after you are on the Contact Message page, click on the Reply Button and the popup will appear. Type in the reply and click the “Send” button to reply to the prospective customer. A Success popup will appear and click Ok to continue.
- Once done, the email will be sent to the user directly.
Want customizations in the contact form? Read: How to customize a contact form on Knorish?