All Knorish paid plans have built-in zoom integration which you can use to conduct live sessions (meetings or webinars), read more about this built-in zoom here: How To Setup Live Sessions & Webinars With Knorish's Native Zoom Integration
However, there could be some uses-cases where you may need to connect your own zoom license. This feature allows you to connect your own Zoom account with Knorish and use it for conducting live sessions and webinars.
IMPORTANT NOTES:
- To complete the Zoom integration, a paid plan for Zoom is required as this process involves adding a user or host on Zoom, which is only available with their paid plan.
- Both Knorish Zoom license and your zoom account cannot be used. Only one will remain active. Once your zoom account is connected, the native zoom integration is disabled instantly.
- If you would like to conduct a webinar in the live sessions, your zoom license should have a webinar feature purchased.
- If you want to run 2 concurrent live sessions (meeting or webinar), you will need to enter two user/host account details when integrating your zoom.
When do you need to integrate your zoom?
Built-in zoom on Knorish has certain restrictions which you will now be able to avoid with your own zoom licenses. In which scenarios would you actually need it?
- If you want to host more than 300 meeting participants or 500 webinar participants
- If you want to add N number of zoom host accounts
- If you want to take ownership / administrative privileges of zoom host accounts and customize zoom settings based on your requirement
If you need any of those, this integration will help you.
Get zoom license
Before you can use your own zoom license, you will need to purchase the license from zoom.
Setting up users/hosts on Zoom
Once you have purchased a Zoom users/hosts license, you will need to set up users, also known as hosts, on Zoom. Zoom requires each user to be a physical user and therefore requires a valid email ID for verification purposes. Without verifying the user account through the email link sent by Zoom, you cannot use that user account directly or on Knorish by integration. This restriction is imposed by Zoom to ensure the authenticity of the user accounts.
If you want to host two live sessions simultaneously (meeting or webinar), you will need to purchase two licenses from Zoom. After that, create two user/host accounts on Zoom and update the details of these users on the Knorish Zoom integration page. Let's walk through the process step by step.
Step 1. Open your Zoom Account by going to https://zoom.us/account/user/ page and select User Management > Users.
- On this page click on the "Add Users" button, this will open a popup where you need to enter a list of users for whom you have purchased zoom licenses. Please note, these email ids should be working email ids, as zoom will send verification emails that you need to verify.
- Make sure to select the Licensed user type and click on the checkboxes "Large Meeting" and "Zoom Webinar", this will vary based on the license you may have purchased.
- In the end, click on the "Add" button, and this will send email verification to all the users you have added. You must need to verify email ids to start using these user accounts for concurrent live session use-case.
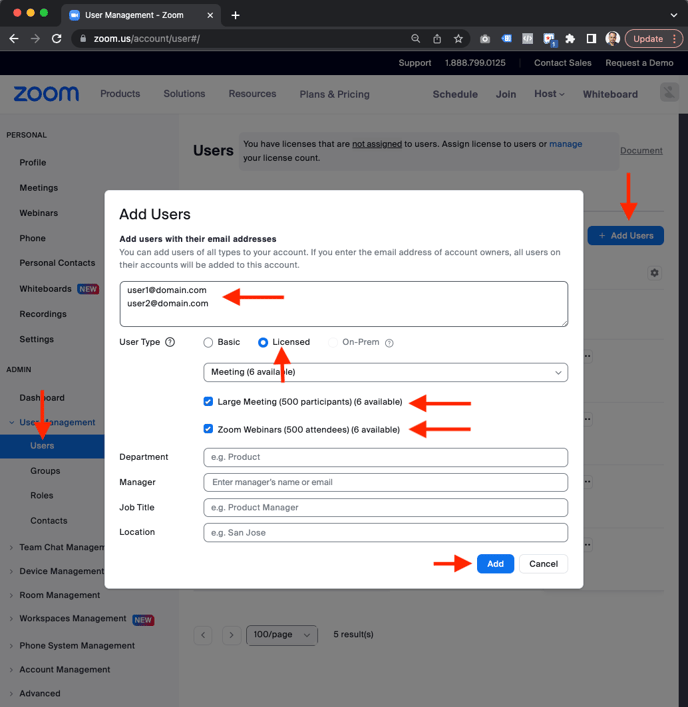
Step 2: Once you have added users on zoom and verified their emails, you need to write down their email id and their account ids, you would need them on the Knorish zoom integration page. You can get an account id by clicking on the user and copying it from the browser URL.

Create Zoom Server to Server OAuth App
To integrate Zoom with Knorish, you will need authorization keys which can be obtained by creating a Zoom app. Let's go through the process step by step.
Step 1: Open URL https://marketplace.zoom.us/develop/create and then create zoom Server-to-Server OAuth by clicking on the 'Create' button.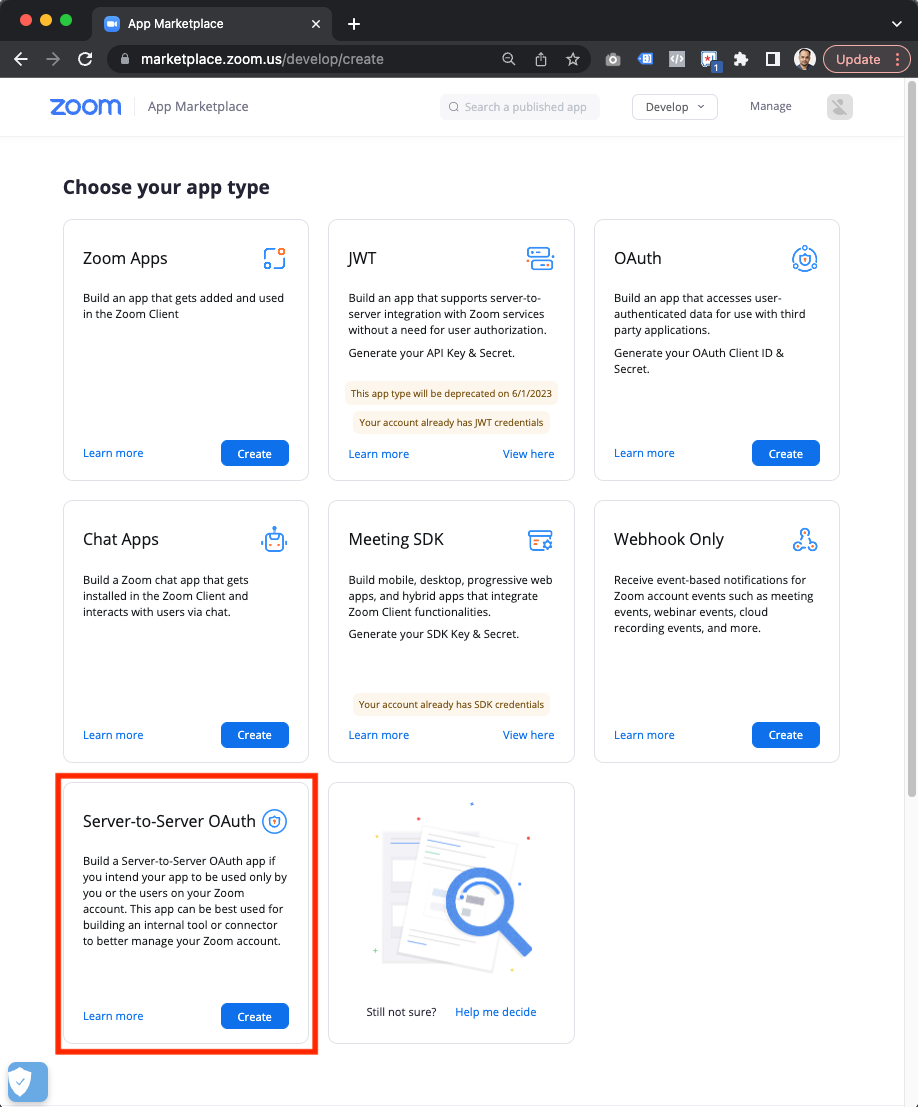
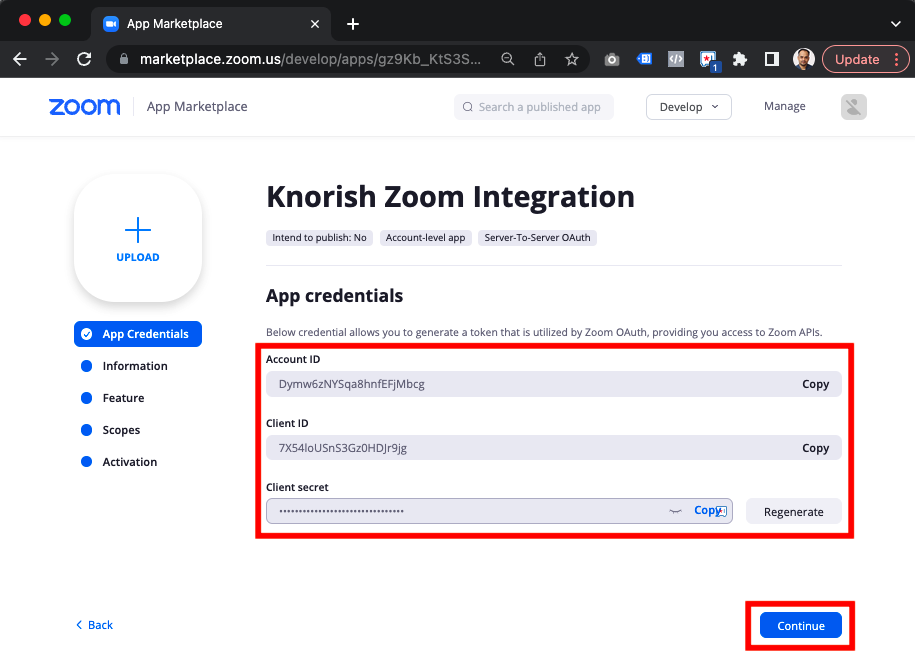
Step 2: Enter the app name such as "Knorish Zoom Integration" and you will be redirected to the App Credentials page. Please copy the Account ID, Client ID and Client Secret, and save them in a notepad. At the end click on the "Continue" button.
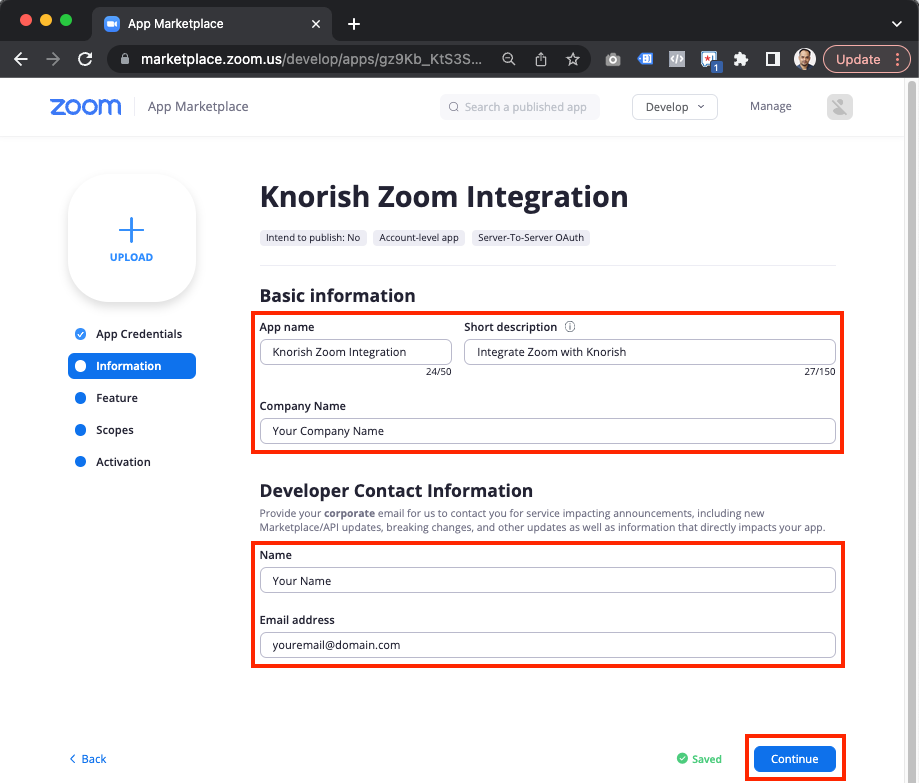
Step 3. Enter basic information about your app like description, company name, developer name, and developer email address as given below and then click on the "Continue" button.
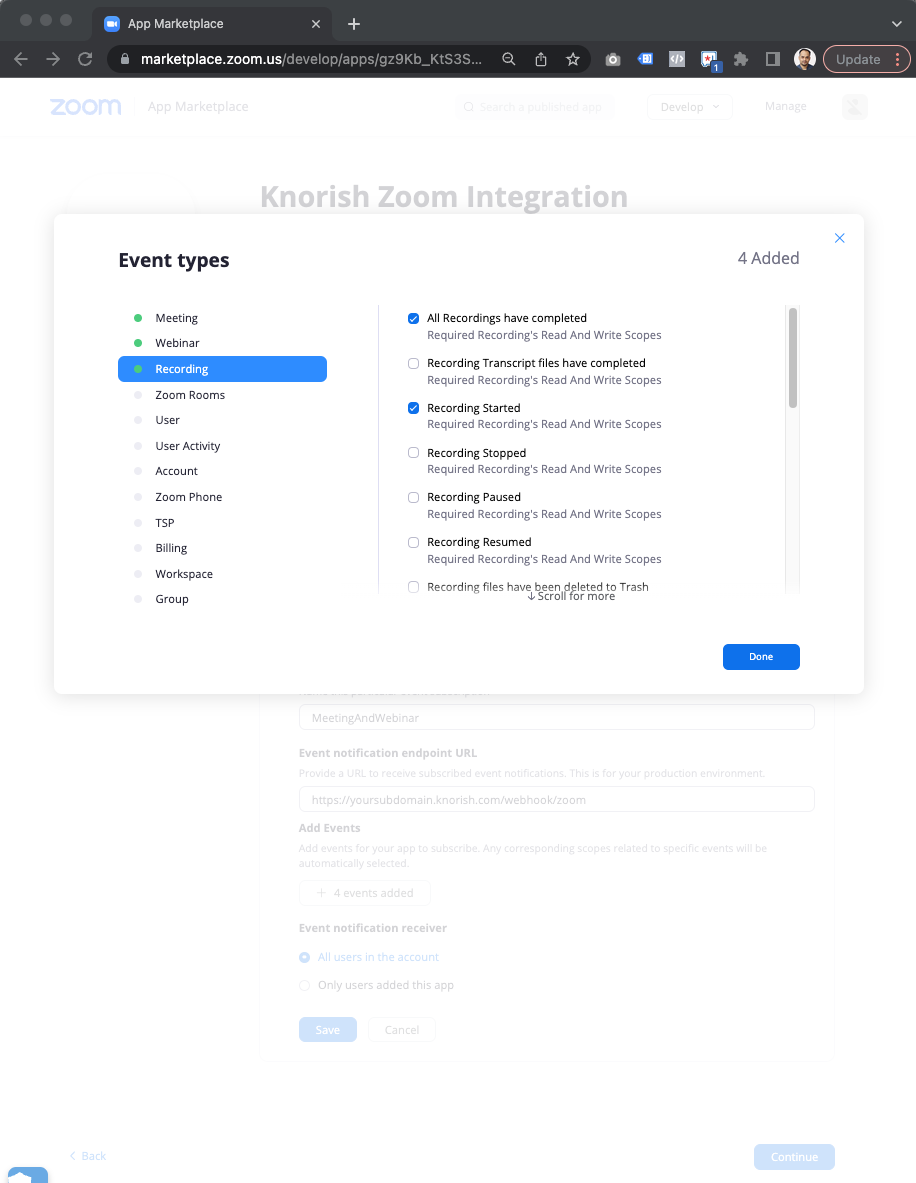
Step 4. Now you are on the Feature page, this is one of the pages where you need to be cautious while completing the details:
- Turn on the Event Subscriptions, enter the subscription name and event notification endpoint URL (this is your Knorish website URL which should end with /webhook/zoom).
- After this, you need to add the events listed below and then click on the "Save" button.
- Select Meeting and then click on the checkbox "End Meeting"
- Select Webinar and then click on the checkbox "End Webinar"
- Select Recording and then click on the checkbox "All Recordings have completed" and "Recording Started"
At the end make sure to click on "Save" and then click on "Continue".

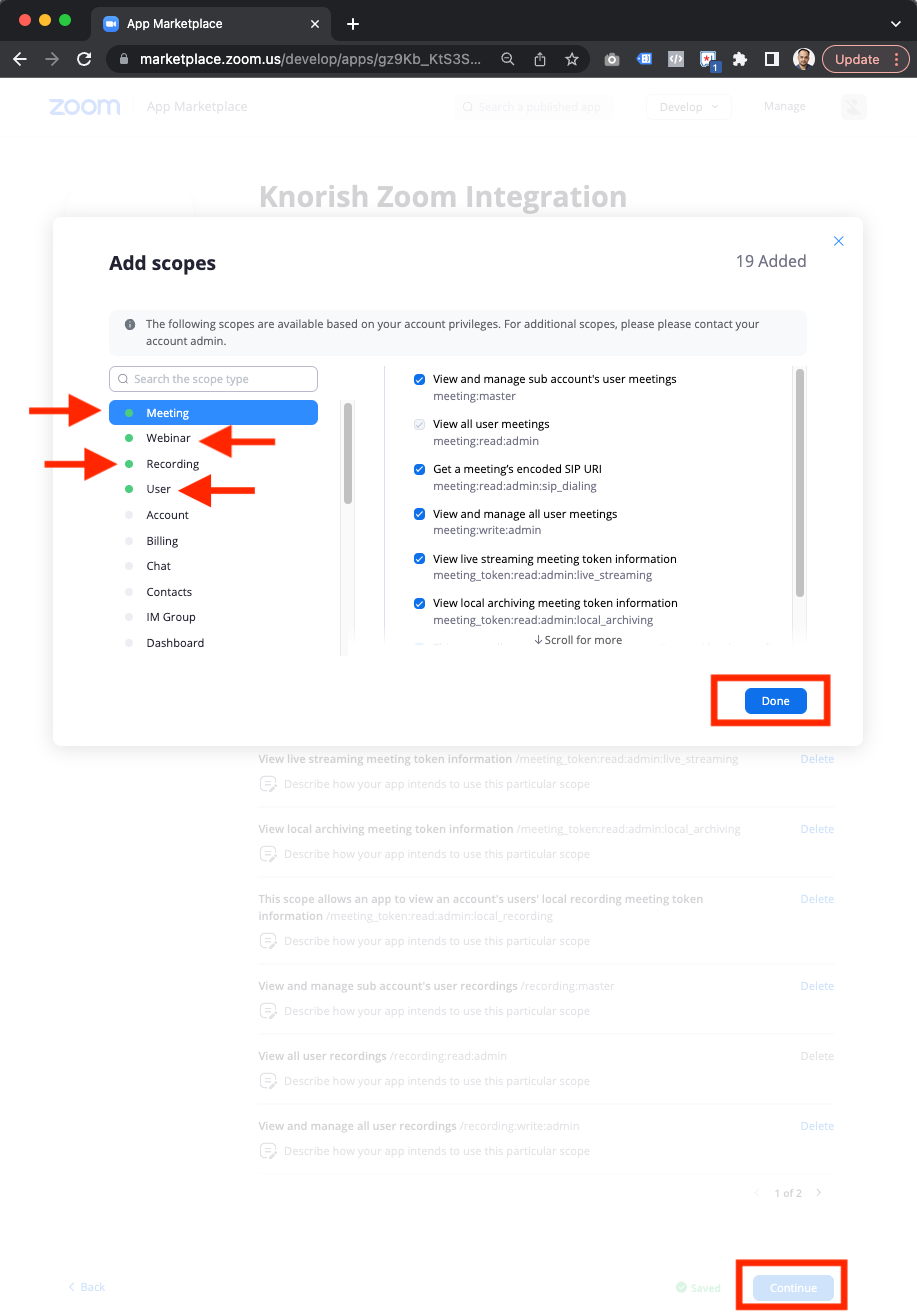
Step 5. Now you are on the Scopes page, this is another page where you need to be careful. Click on "Add Scopes", this will open a popup.

On the Scopes popup, select everything inside Meeting, Webinar, Recording and User. At the end click on "Done" and then click on "Continue".
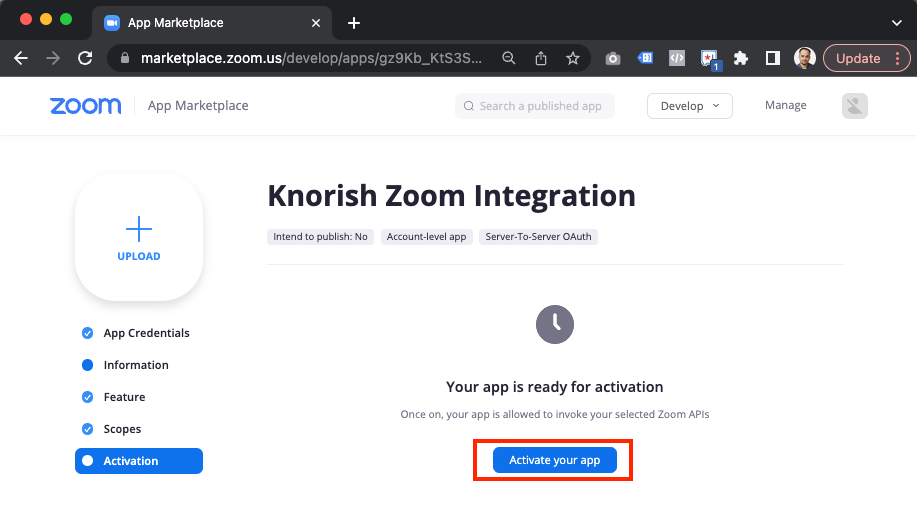
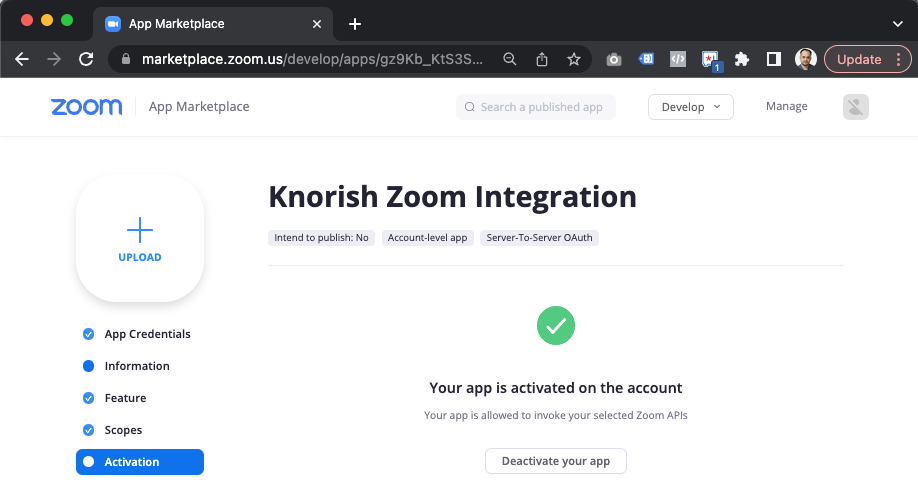
Step 6. Now you are on the "Activation" page, here click on the "Activate your app" button.
Create Zoom Meeting SDK App
If you want to conduct Zoom meetings or webinars directly in a web browser during your course delivery, this feature is extremely useful because participants won't need to install the Zoom app on their devices. To set this up, simply follow the steps below.

Step 1: Open URL https://marketplace.zoom.us/develop/create and then create zoom Meeting SDK by clicking on the 'Create' button.
Step 2: When entering the app name in the popup, make sure to uncheck the "public to marketplace" checkbox. This is because in our case, we don't need the app to be available for general public use. Our goal is to simply play Zoom meetings or webinars inside the browser.
Step 3: Provide all the necessary information and make sure to save the client ID and Client Secret in a notepad. These details will be required when entering them on the Knorish integration page. Keep in mind that there may not be a need to activate this app, unlike the server-to-server OAuth app.
Zoom Integration on Knorish
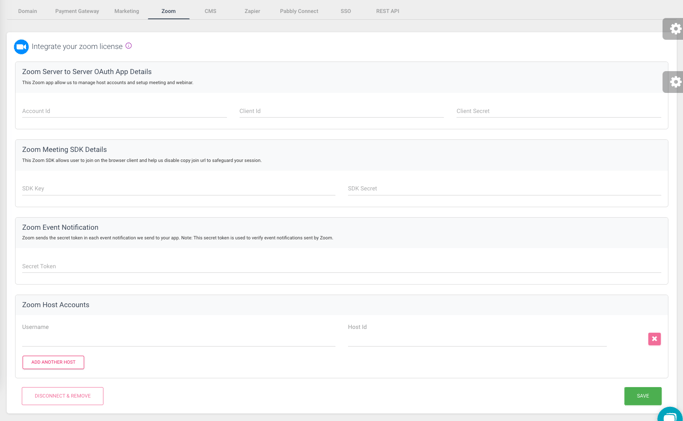
Once you have the OAuth app set up and all user accounts set up on zoom, you can integrate it on Knorish using the Integration > Zoom page.
Fill in all the details on the form and click on the "Save" button.
Now you are good to conduct zoom live sessions and webinars.