In today's competitive online marketplace, the conclusion of a sale is not just an end, but a new beginning. A Thank You page is a pivotal tool in not just acknowledging a customer's purchase, but also in driving additional engagement and sales.
By effectively utilizing this page, businesses can create a more dynamic and interactive post-purchase experience. This leads to increased customer satisfaction, higher upsell opportunities, and deeper community integration.
Watch this video for the complete step-by-step process.
In this guide, we'll walk you through the steps to set up a thank you page for both your courses and bundles, enabling you to drive community engagement, upsell products, and track conversions efficiently.
- What Is A Thank You Page
- How To Setup A Thank You Page For Courses/ Webinars/ Ebook Downloads
- How To Setup A Thank You Page For Bundles
What is a Thank You Page and How Does It Work for Users?
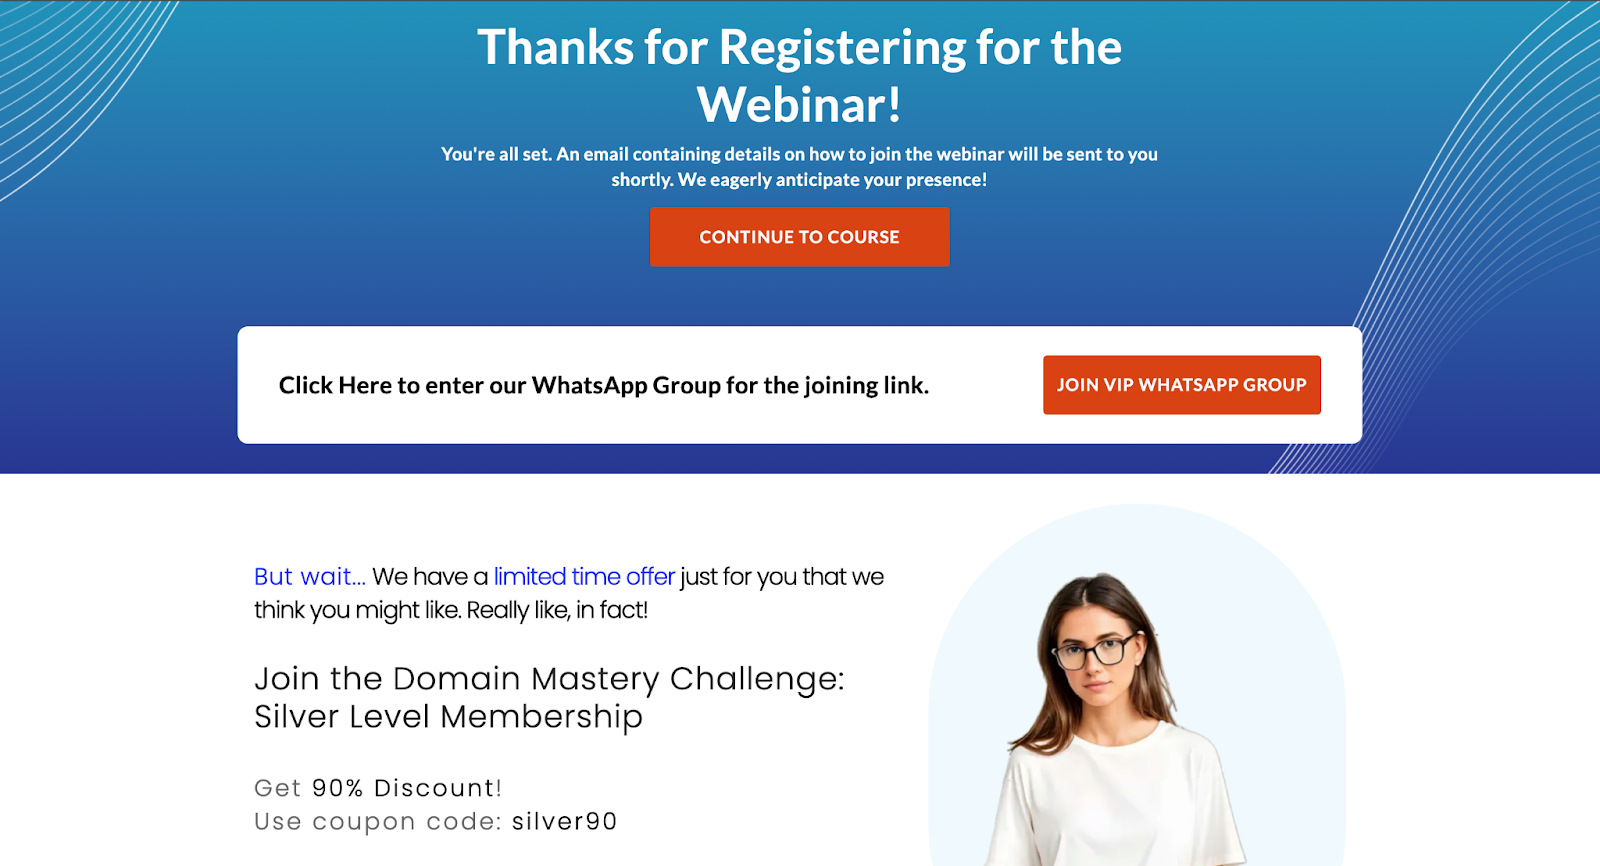
A Thank You page is a standalone web page that appears immediately after a customer completes an action, such as making a purchase, signing up for a webinar, or downloading a resource on your Knorish site. This page does more than acknowledge their action; it's a strategic touchpoint in the customer journey.
When a user completes an action, they are typically at a peak engagement level, making it the perfect moment to offer additional value. This could include:
- Upsell Opportunities: Direct customers to related products or exclusive offers, capitalizing on the momentum of their initial purchase.
- Community Engagement: Encourage customers to join private communities or social platforms associated with your brand, fostering a sense of belonging and ongoing interaction.
- Discount Promotions: Offer discount coupons for future purchases, incentivizing repeat business and customer loyalty.
- Custom Event Tracking for Ads: Enable custom events to track user behavior. This feature is particularly useful for tracking the completion of sign-up processes or conversions, allowing for more tailored and effective advertising strategies.
- Feedback and Surveys: Use this space to solicit customer feedback or responses by adding custom survey forms, which can provide valuable insights for business improvement.
- Content Downloads: You could also offer access to content as downloadables such as bonuses promised in the webinar.
By capitalizing on this moment of engagement, a Thank You page turns a single interaction into an opportunity for further engagement and sales!
Since all digital products on Knorish are offered via courses/ bundles, you could create a thank you page for either of the options. Now let’s show you how.
How to setup a thank you page after sign up/ purchase for courses, webinars or ebook downloads
- Log into your Knorish account
- Click on courses. You can either create a new course or select an existing one.
- Access the Landing Page section. Ensure your landing page is live.
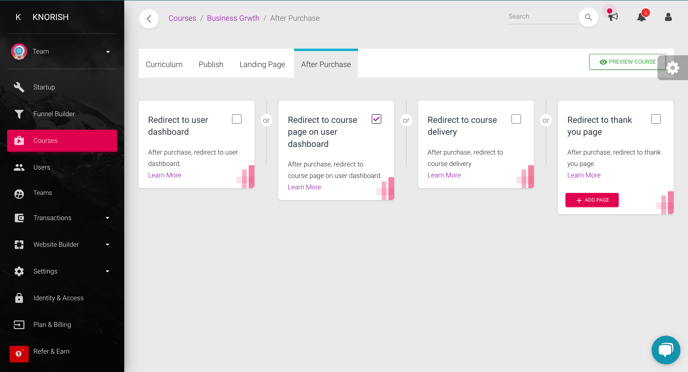
- Click on the 'After Purchase' section in the course settings.
- Here, choose your redirect option: Under 'After Purchase', you have four options:
- Redirect to the user dashboard
- Redirect to the course page
- Redirect to course delivery
- Redirect to a custom thank you page (select this for setting up a thank you page)
- Click On Add Page.
- From the list of pages available, you can either choose a template thank you page, start blank or use an existing thank you page from the list in My Pages.
- Customize the page using the page builder. Remember to add respective links to join WhatsApp groups, upsells for other digital products, and more.
- After completing the customization, click on 'Save' to save the changes on the page.
- Then click on 'Settings' in the After Purchase Section of the course, update page information:
- Page name
- Slug
- Title Description
- Description for SEO
- Keyword for SEO
- Header & Footer Code
- Then choose to switch off the top menu and footer on page
- Select Publish this page.
- Click 'Save'.
How to set up a thank you page after bundle signup/ purchase?
- Log into your Knorish account
- Select Bundles, Under Courses
- You can create a new bundle or edit an existing one.
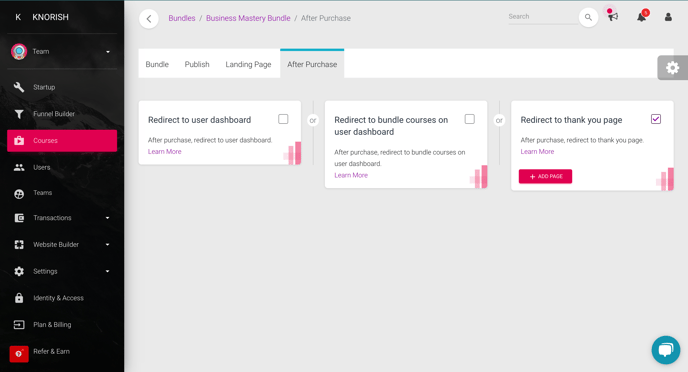
- In the bundle settings, locate the 'After Purchase' section. Here, you have three options:
- Redirect to the user dashboard
- Redirect to bundle courses on the user dashboard
- Enable a custom thank you page (choose this for a thank you page)
- Click On Add Page.
- From the list of pages available, you can either choose a template thank you page, start blank or use an existing thank you page from the list in My Pages.
- Customize the page using the page builder. Remember to add respective links to join WhatsApp groups, upsells for other digital products, and more.
- After completing the customization, click on 'Save' to save the changes on the page.
- Then click on 'Settings' in the After Purchase Section of the course, update page information:
- Page name
- Slug
- Title Description
- Description for SEO
- Keyword for SEO
- Header & Footer Code
- Then choose to switch off the top menu and footer on page
- Select Publish this page.
- Click 'Save'.
💡Important considerations:
- With iOS 14 privacy updates, the method of tracking conversions may lead to data inaccuracies. Refer to https://omnishopapp.com/blog/how-apples-ios-14-privacy-update-impacts-e-commerce-businesses/. For precise tracking, Meta suggests setting up the conversion API and avoiding reliance on Thank You page-based tracking methods. Read more about FB Conversion API setup.
- Explore the various options for tracking purchases and setting up custom event tracking when a purchase occurs by clicking here How to track Purchase events or custom events when a user completes a purchase?
- In case no option is chosen from the 'after purchase section' for a bundle, or if the redirect to thank you page is not turned on, the users will be sent to the course user dashboard section by default.
- In the case of courses, a user would be redirected to to course delivery page if that setting is turned on in course settings. Else, the user would be redirected to their dashboard.
- To learn how to customize a landing page using the page builder, visit How to design or create a page using the new Page Builder?