Live sessions with Knorish offer a dynamic way to connect and engage with your audience. Whether you're hosting sessions, meetings or webinars, this article covers the step by step process on how to get started and engage your audience live.
Note: We are upgrading our live stream technology with Microsoft Teams as a Microsoft Founder Hub partner company. This means that unlike the Zoom integration limit of 500 participants now you can do 10,000 participants webinar style town halls. Recordings will now be available for more than 3 months, forget the 10 day limit. Webinars can host 1000 participants and town hall can host up to 10,000 participants. And you also have access to 1 TB free storage on Onedrive along with Teams admin credentials. With Zoom changing their ISV program terms in India, we've seized the opportunity to provide the world's most advanced features across any content delivery platform. We hope your business grows even faster with these breakthrough enhancements.
Covered in this Article
- About Live Sessions
- Live streaming options available inside Knorish
- Types and formats of live sessions
- Differences between Microsoft Teams' Meetings, Webinars & Town Halls
- How to create a live session?
- How to use Microsoft Teams meetings on Knorish for live sessions?
- How to use Microsoft Teams webinars on Knorish for live sessions?
- How to use Microsoft Teams town hall on Knorish for live sessions?
- How to use Microsoft Teams for meeting or webinar when you have multiple concurrent licenses?
- How to use Zoom via Integration on Knorish for live sessions?
- How to use any other live streaming software with Knorish for live sessions?
- Additional Important Questions To Consider
-
- How to create and start a live session immediately?
- Check scheduled live sessions
- Learner’s Login Experience
- Recording, Retrieving & Uploading Live Session Videos For Replays
- How to send live session reminder emails to learners?
- Edit or cancel a live session and notify learners about changes or cancellations
- Create temporary password for using Microsoft Teams
Important Notes:
- Microsoft Teams Meetings can accommodate up to 300 participants with full interactivity.
- Microsoft Teams Webinars support up to 1,000 participants with limited interactivity.
- Microsoft Teams Town Halls allow up to 10,000 participants with one-way streaming.
- Any live session can be started 15 minutes before their scheduled time. For instant sessions, set the start time to 5 minutes from now and you will be able to go live immediately.
- Both meetings and webinars can be set up for a maximum of 30 hours.
- If you are using Zoom via Integration, your meeting will automatically be recorded in the Cloud. If you wish to make changes, simply stop the recording and start it again by selecting the desired location directly from the Zoom interface.
- Meetings created automatically in Teams by Knorish will be recorded. If you have manually created a meeting using the Teams calendar (meeting, webinar, or town hall), you will have the option to start recording through the Teams interface.
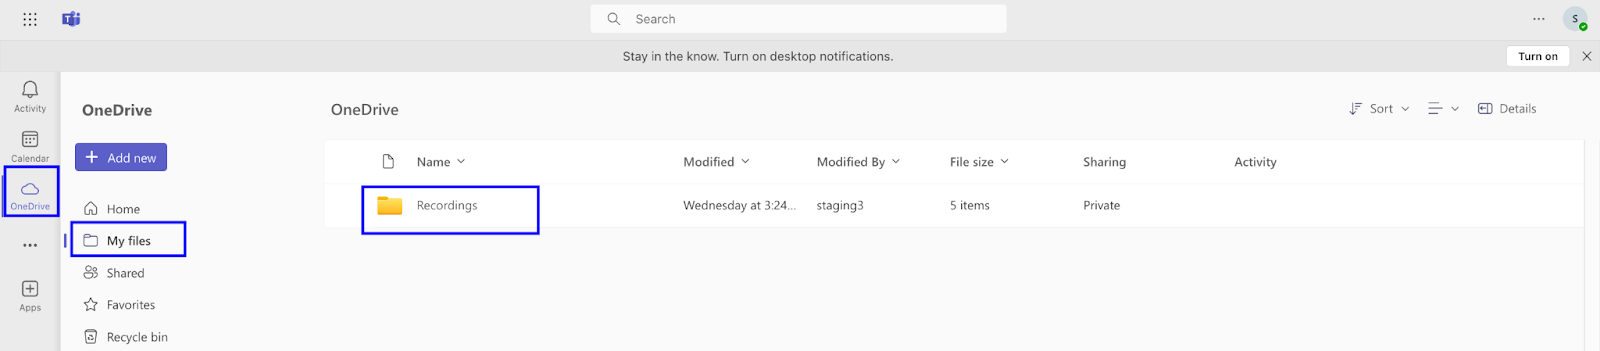
- To access the recordings, log in to the Microsoft Teams app or visit Microsoft Teams, then navigate to OneDrive > My files. This will display all recorded files.
- Zoom recordings can be downloaded from zoom portal directly by navigating to Account Management > Recording Management.
- By default, Microsoft Teams recordings are deleted after 120 days automatically. For zoom via Integration, it will depend on the zoom plan, storage size and policies if set up any. Learn more about Zoom Recording Storage policies here - https://support.zoom.com/hc/en/article?id=zm_kb&sysparm_article=KB0067670.
- With Microsoft Teams integration, admins gain full access to a dedicated Teams account, offering additional functionalities beyond live sessions.
- Initially, users must sign in to Microsoft Teams using the provided credentials. Post which, no further sign-ins are needed unless the password is changed by the user directly on Teams. The Knorish support team can only help if the admin forgot the password as they are supposed to maintain or keep it saved securely. In such case, users will have to reach out to Knorish at support@knorish.com to reissue the password.
- Meeting and webinar links created are permanent links applicable for that specific session. Meaning, even after you click End Meeting, you and session participants are still able to rejoin the session and continue as is. However, in case the live session extends beyond the time pre-set inside your Knorish account, then a 10 mins buffer is given for the session (meeting and webinar) to end. Post 10 mins buffer your session will be marked as ended, and new user joining requests from course delivery page will be redirected to session ended page. However we never forcefully terminate your running session even if exhausted for hours.
- If the host happens to LEAVE the meeting/ webinar for any reason while using Microsoft Teams by Knorish, the host can join back by clicking on the go live button in the publisher dashboard.
- Live session license status (Occupied or Available) will not be correct if you are using Microsoft Teams directly outside the defined workflow.
- Specifically for Mac, iPad or iPhone, in order to join a meeting or a webinar, you will need to enable pop-ups. This is irrespective of which live streaming technology you use - Microsoft Teams by Knorish, Zoom via integration, or any other live streaming platform. Shown below is how to enable pop-ups for it.
Mac Screenshot-1.png?width=378&height=283&name=image%20(3)-1.png)
iPhone screenshot-1.png?width=173&height=307&name=image%20(4)-1.png)
About Live Sessions
Live Sessions let you share your knowledge with your audience with even more engagement. You can now conduct live sessions and automate the entire logistics of planning live sessions, reminders, payment collection, managing learners, and more straight from within your Knorish site. You can choose to create single, multiple, or ongoing live sessions and offer live coaching, consulting, online workshops and host webinars as well.
Live streaming options available inside Knorish
Knorish offers multiple options to host your live sessions, meetings or webinars:
- Microsoft Teams By Knorish: Allows you to host meetings or webinars for up to 10,000 participants.
- Zoom Via Integration: Connect your Zoom license with Knorish to host meetings, sessions, or webinars. The availability of webinar functionality depends on the Zoom license subscribed to.
- Any other live streaming software of your choice: Use any live streaming software as per your choice.
Types and formats of live sessions
When planning to engage with your audience live, you have the flexibility to conduct various types of live interactive sessions.
Here are two primary formats you can choose from:
-
Meetings: Meetings are designed for more interactive smaller group sessions. These are designed to be collaborative sessions with all participants being able to screen share, turn on their video and audio, and view who else is in attendance. Some features may be different based on customizations or depending on the software you are using.
-
Webinars: Webinars allow you to conduct sessions ideal for a large audience. Besides the standard video, audio, and screen sharing, webinars allow view-only access to participants who can interact with the host and other designated panelists via chat, and answer polls as well. With webinars, hosts can control whether participants can unmute, use their cameras, or communicate with others, ensuring a streamlined and distraction-free session. Some features may be different based on customizations or depending on the software you are using.
Sessions based on frequency
When planning your live sessions on Knorish, you can tailor the scheduling to fit your specific needs by choosing from three types of session frequencies.
- Single Session: Schedule a one-time webinar, workshop or a meeting for a specific date and time.
- Multiple Sessions: Set up pre-defined sessions across different dates and times, ideal for a program or topic that requires multiple sessions, workshops or meetings.
- Ongoing Sessions: Create recurring sessions by selecting specific days or dates that repeat weekly, monthly or annually.
Differences between Microsoft Teams' Meetings, Webinars & Town Halls
Microsoft Teams offers versatile options for hosting virtual events, each tailored to different needs. Understanding the differences between Meetings, Webinars, and Town Halls will help you choose the right format for your event.
| Meeting | Webinar | Town Hall | |
| Attendee Limits | 300 | 1000 | 10,000 |
| Can Attendees View Attendance Count | ✔️ | ✔️ | ✖️ |
| Lobby | ✔️ | ✔️ | ✔️ |
| Green room | ✔️ | ✔️ | ✔️ |
| Breakout rooms | ✔️ | When attendee count is less than 300 | ✖️ |
| Camera & mic options for attendees | ✔️ | Default settings do not permit attendees to turn on their camera & mic. Options available for webinar hosts to enable them | ✖️ |
| Q&A | ✔️ | ✔️ | ✔️ |
| Recording | ✔️ | ✔️ | ✔️ |
| Whiteboard | ✔️ | ✔️ | ✖️ |
| Content Sharing | ✔️ | ✔️ | ✔️ |
| Record automatically (When initiated via Knorish) | ✔️ | ✔️ | ✔️ |
| Noise Cancellation | ✔️ | ✔️ | ✔️ |
| Attendance report | ✔️ | ✔️ | ✔️ |
| Choose co-organizers | ✔️ | ✔️ | ✔️ |
For a more detailed comparison of latest features available in MS Teams' Meetings, Webinars and Town halls, please check the MS Teams documentation below:
- Meetings, webinars, and town halls feature comparison
- Overview of meetings, webinars, and town halls
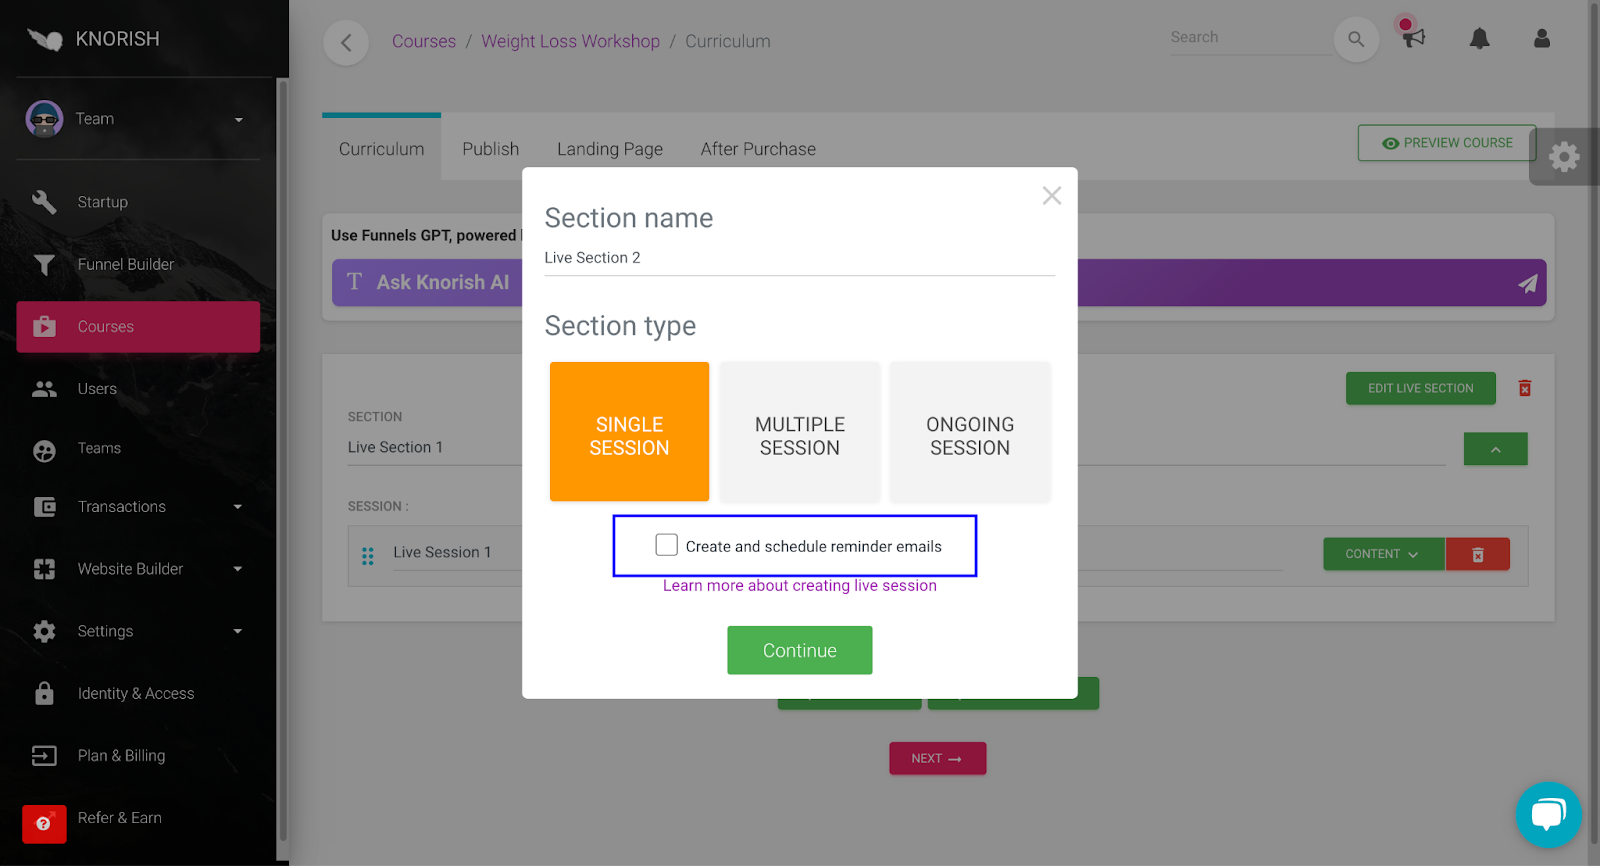
How to create a live session?
Here’s how to create a live session on your Knorish Account.
Login to your Knorish Account- Access the dashboard
- Click on Courses
- Create a New Course/ access an existing course by clicking on the Builder icon above the course name
- Click on Add Live Section
- Add Section name on the pop-up
- Under section type, choose your format type:
- Single Session: It is a one-time session.
- Multiple Session: Schedule multiple sessions at any date and time or daily sessions.
- Ongoing Session: Schedule sessions based on the frequency of the sessions whether it is on a weekly, monthly or yearly basis.
- Select ‘’Create and schedule reminder emails’’ if you want to schedule an automated reminder email 1 hour before the scheduled start time of the session
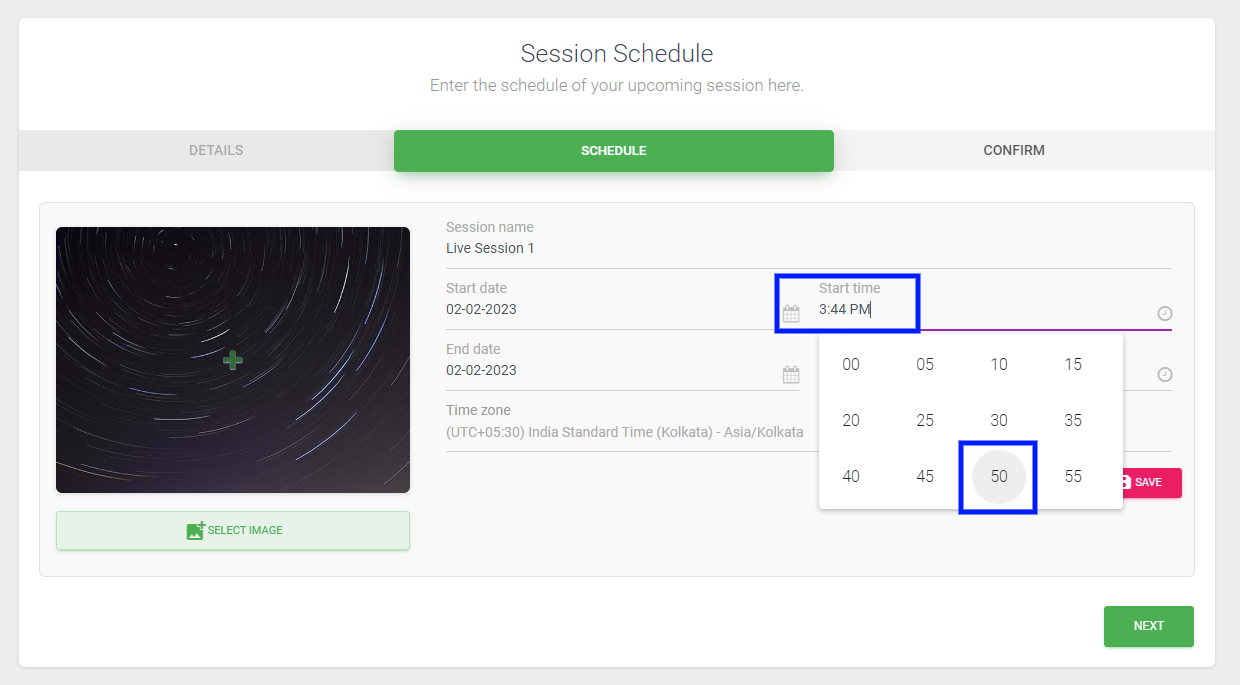
- Fill in the details such as Session name, start & end date & time, time zone, and the live session thumbnail.
- Click Save
- On the Confirm Schedule section, click Confirm
- Select either “I want to add more sections" or "I’m done" if you wish to add more sessions or update the settings.
The sessions will be saved and will be updated on the dashboard under Startup and in the course where the session was created.
How to use Microsoft Teams meetings on Knorish for live sessions?
Microsoft Teams by Knorish allows you to conduct large scale meetings with up to 300 participants with ease. Do note that as a meetings option, users will be able to turn on their cameras, unmute themselves and chat with other participants. In this section, we will show you the step by step process on how to go live using the feature. To learn more about the Microsoft Teams meeting experience, click here - https://learn.microsoft.com/en-us/microsoftteams/view-only-meeting-experience.
Here's how to go live via Microsoft Team Meetings using Knorish.
- Access your dashboard
- Once the live session has been created inside a course, Click on Startup
- Under Startup, view the live sessions already setup
- Click on Go Live
- Under Live Session Software, select Microsoft Teams by Knorish if not selected already
- Under Live Session Type, Select Meeting
- Create Automatically will be auto-selected
- If you’re using the Microsoft Teams license by Knorish for the first time, you will need to login on Teams (App or web) using credentials offered by Knorish
- Click on the link shared in the pop-up message: https://teams.microsoft.com to launch the login page
- Copy paste the credentials listed below on the popup or you can also click on access credentials to find your login ID and password
- Login to Microsoft Teams using the credentials shared
- Once the login is complete, head back to Knorish
- Under Start live session, click on the radio button to select the Teams license issued
- Click Start Now
- The Microsoft Teams will start your meeting

💡 Important Note:
- To share the meeting link with users, click on Copy The Join Link For The Users.
- To share the meeting link for Guest Speakers, click on Copy The Join Link For The Guest Speaker.
- Once the meeting is over, click on End Meeting inside Microsoft Teams to end the meeting.
- Meeting Links are permanent links, meaning if time is still left, users and you can always go back to the same meeting by clicking on the Continue button under Start live session, or via the direct meeting link. If you need to reuse the host/license to conduct another session around the same time, you may have to forcibly end the currently running meeting. To do that: click the 'End Meeting' icon, then confirm by clicking 'Yes' on the popup. This will free up the host/license for another session. As such, after the session ends, users who click 'Join' on course delivery will be redirected to the session-ended page.
How to use Microsoft Teams webinars on Knorish for live sessions?
Microsoft Teams option inside Knorish allows you to conduct large scale sessions as well with up to 10000 participants.
Here’s how to use Microsoft Teams for webinars on Knorish.
- Access your dashboard
- Once the live session has been created inside a course, click on Startup
- Under Startup, view the live sessions already setup
- Click on Go Live
- Under Live Session Software, select Microsoft Teams by Knorish if not selected already
- Under Live Session Type, Select Webinar
- The option I will create the link is auto-selected
- Using Microsoft Teams By Knorish For The First Time: If you’re using the Microsoft Teams license by Knorish for the first time, you will need to sign up on Teams with the login credentials offered by Knorish
- Click on the link shared in the pop-up message: https://teams.microsoft.com to launch the login page
- Copy paste the credentials listed below on the popup or you can also click on access credentials to find your login ID and password
- Login to Microsoft Teams using the credentials shared
- Once logged in, click on Calendar on the left
- Next to New Meeting, click on ⌄ Icon
- Select Webinar
- On the next page, under Details in Settings, update the information needed including Title, Start Date & Time, End Date & Time, and Description
- In case, you have additional speakers, click on Add External Speakers and add their email IDs. The external speakers added will also get a calendar invite email with the direct joining link
- Ensure to leave the event access as Public
- Under theming, if required, update the Banner image, logo and theme color for custom branding
- Once updated, click on Save
- Click on Publish Site
- On the pop-up, Click on Publish to confirm
- Click on Join to start the webinar
- Select your camera, audio, background settings on Teams
- Click on Join Now
- Click on People, then on Share invite
- Click on Copy meeting link
- Head back to Knorish, under Login on Microsoft Teams and start the session, click on the radio button next to license type issued
- Paste the link, under Paste joining link for users
- Click on Start Now
💡 Important Note: Do not paste the Teams webinar event registration link in Knorish. It would send the users to the event registration page on Microsoft Teams. Join the webinar and then copy the link available from the People > Share Invite section.
How to use Microsoft Teams town hall on Knorish for large online events?
In this section, we'll guide you through the steps of utilizing Microsoft Teams to conduct large scale online events with up to 10,000 participants effectively.
Here’s how to use Microsoft Teams Town hall on Knorish.
- Download the Microsoft Teams App or software on your desktop or laptop
- Access your dashboard
- Once the live session has been created inside a course, click on Startup
- Under Startup, view the live sessions already setup
- Click on Go Live
- Under Live Session Software, select Microsoft Teams by Knorish if not selected already
- Under Live Session Type, Select Webinar/ Townhall
- The option I will create the link is auto-selected
- Using Microsoft Teams By Knorish For The First Time: If you’re using the Microsoft Teams license by Knorish for the first time, you will need to sign up on Teams with the login credentials offered by Knorish
- Open the Microsoft Teams app
- Click on the link shared in the pop-up message: https://teams.microsoft.com to launch the login page
- Copy paste the credentials listed on the popup or you can also click on access credentials to find your login ID and password
- Login to Microsoft Teams app using the credentials shared
- Once logged in, click on Calendar on the left
- Next to New Meeting, click on ⌄ Icon
- Select Town hall
- On the next page, under Details in Settings, update the information needed including Title, Start Date & Time, End Date & Time, and Description
- In case, you have additional speakers, click on Add External Speakers and add their email IDs. The external speakers added will also get a calendar invite email with the direct joining link
- Ensure to leave the event access as Public
- Click on Save and send invites
- Click on Publish
- Click Publish on the pop-up
- Click on Join
- Select your camera, audio, background settings on Teams
- Click Join Now
- Click on People
- Click on People, then on Share invite
- Click on Copy meeting link
- Head back to Knorish, under Login on Microsoft Teams and start the session, click on the radio button next to license type issued
- Paste the link, under Paste joining link for users
- Click on Start Now
Important Note: Ensure to add the external speakers in the details while setting up the Town hall before going live. Once the Microsoft Team Townhall goes live, you will not be able to add external speakers or promote anyone as panelists.
How to use Microsoft Teams for meeting or webinar when you have multiple concurrent licenses?
In this section, we'll guide you through the steps of utilizing Microsoft Teams to conduct meetings or webinars effectively when managing multiple concurrent licenses. You can get multiple separate licenses as addons which will help in conducting multiple concurrent live sessions. Admins have access to all credentials of the multiple licenses and need to share the same with the respective users for them to login to the Teams account on their devices.
Here’s the step by step process for running concurrent meetings or webinars basis the licenses added in your Knorish account:
- Access your dashboard
- Once the live session has been created inside a course, Click on Startup
- Under Startup, view the live sessions already setup
- Click on Go Live
- Under Live Session Software, select Microsoft Teams by Knorish if not selected already
- Under Live Session Type, Select Meeting
- Create Automatically will be auto-selected
- Using Microsoft Teams By Knorish For The First Time: If you’re using the Microsoft Teams by Knorish for the first time, you will need to sign up on Teams with the login credentials offered by Knorish.
- Please ensure to select the correct user license when going live. Choosing the wrong license would result in joining the meeting as a participant instead of the host/admin. Additionally, you won't be able to change the user role once the session has started.
💡 Important Note:
In case if you have zoom via integration, you can use your zoom along with Microsoft Teams by Knorish. Both work together seamlessly. When going live, ensure to select correct software, and Knorish will launch your session as per your selected software.
In case if you have purchased additional concurrent sessions license, for example two teams concurrency and integrated two zoom hosts, that way you will be able to conduct 4 concurrent sessions.
How to use Zoom via Integration on Knorish for live sessions?
This section explains how to start your live sessions with Zoom step by step. You'll need to get a Zoom license and integrate it into Knorish before using this feature. If you're planning to host a webinar, you'll need to purchase the appropriate Zoom plan. If you only have a Zoom meeting license and try to start a webinar, the system will display a licensing error. To learn more about how to Integrate your Zoom license inside Knorish, checkout the steps here: Zoom Integration
Here’s how to get started with Zoom for live sessions:
- Access your dashboard
- Once the live session has been created inside a course, click on Startup
- Under Startup, view the live sessions already setup
- Click on Go Live
- Under Live Session Software, select Zoom via Integration
- Select Meeting Or Webinar
- Create Automatically will be selected by Default in either cases
- Under Start live session, click Start Now
- On your browser, a new tab will appear, click on open Zoom
- Zoom Webinar will start immediately.
How to use any other live streaming software with Knorish for live sessions?
This section will share the step by step process on how to go live in your live sessions using any live streaming tool of your choice.
Here’s how to do this:
- Access the Knorish dashboard
- Click on Startup
- Under Live sessions, click Go Live
- On the pop-up, under Live Session Software, select Any Other
- Choose Meeting or Webinar
- The option - I will create link will be auto-selected
- Paste the meeting or webinar link under Paste joining link for users
- Click Start Now
You will be able to go live from Knorish.
Which link to share with participants for a webinar or Townhall on MS Teams?
Sharing the correct link for your MS Teams Webinar or Townhall ensures that your participants can join smoothly and without confusion. 
Here’s how you can find and share the invite link directly :
- Log in to your Microsoft Teams account using the credentials provided by Knorish
- Navigate to the Calendar section on the left sidebar
- Find your scheduled webinar or townhall
- Click on the webinar/ Townhall < People < Share Invite
- Click on the button to copy the meeting link provided
You can now share this link with your audience anytime you wish.
Ideal MS Teams Settings for hosting a webinar on MS Teams?
Configuring your MS Teams settings correctly is essential for a smooth and professional webinar experience. Below are the recommended settings to ensure your webinar runs flawlessly:
- Add external presenters before hand to ensure other presenters and hosts get their unique joining links and calendar invites
- Under Meeting Options, ensure the following are enabled:
| Who can bypass the lobby? | Everybody |
| Enable Green room | On |
| Allow mic for attendees | Off |
| Allow camera for attendees | Off |
| Meeting chat | On |
| Record and transcribe automatically | On |
Rest of the meeting options may stay the same.
Inside the webinar, before going live:
| View < Select Max Gallery Size | 4 People |
| Under People, select your name and click on the 3 dots | Select Spotlight for everyone |
| When sharing screen, under Presenter mode | Select Standout mode |
There's a lot more that you can do with MS Teams on Knorish. These settings are the bare minimum that you must setup to ensure your participants have a great learning experience.
How To Create And Start A Live Session Immediately?
Any live session can be started 15 minutes before their scheduled time. For instant sessions, set the start time to 5 minutes from the current time. Once done, the live session would be added to the list of upcoming sessions under startup and you will be able to go live immediately.
Here's how you can do it:
- Go to your Dashboard
- Click on Courses > Create a new course > Enter a Course name
- Click on Add Live section > Under section type, select Single Session
- Fill in the details such as the Session name and the live session thumbnail
- Set the 'Go Live' time for your session by selecting the nearest upcoming 5-minute interval
- Click Save and press Next
- Click on Startup on the menu
- Press Go Live
- Follow the steps listed to enable the go live above using Microsoft Teams by Knorish, Zoom via integration or Any other streaming tool of your choice.
💡 Important Note:
While setting up a new live session, in case you select 'Create and schedule reminder emails' will send the emails instantly to all participants.
How to create or edit a landing page for live sessions?
Once a live session is created inside a course and the course is published, click on the landing page tab and start designing your course page and connect all the call to action buttons on the page with the course.
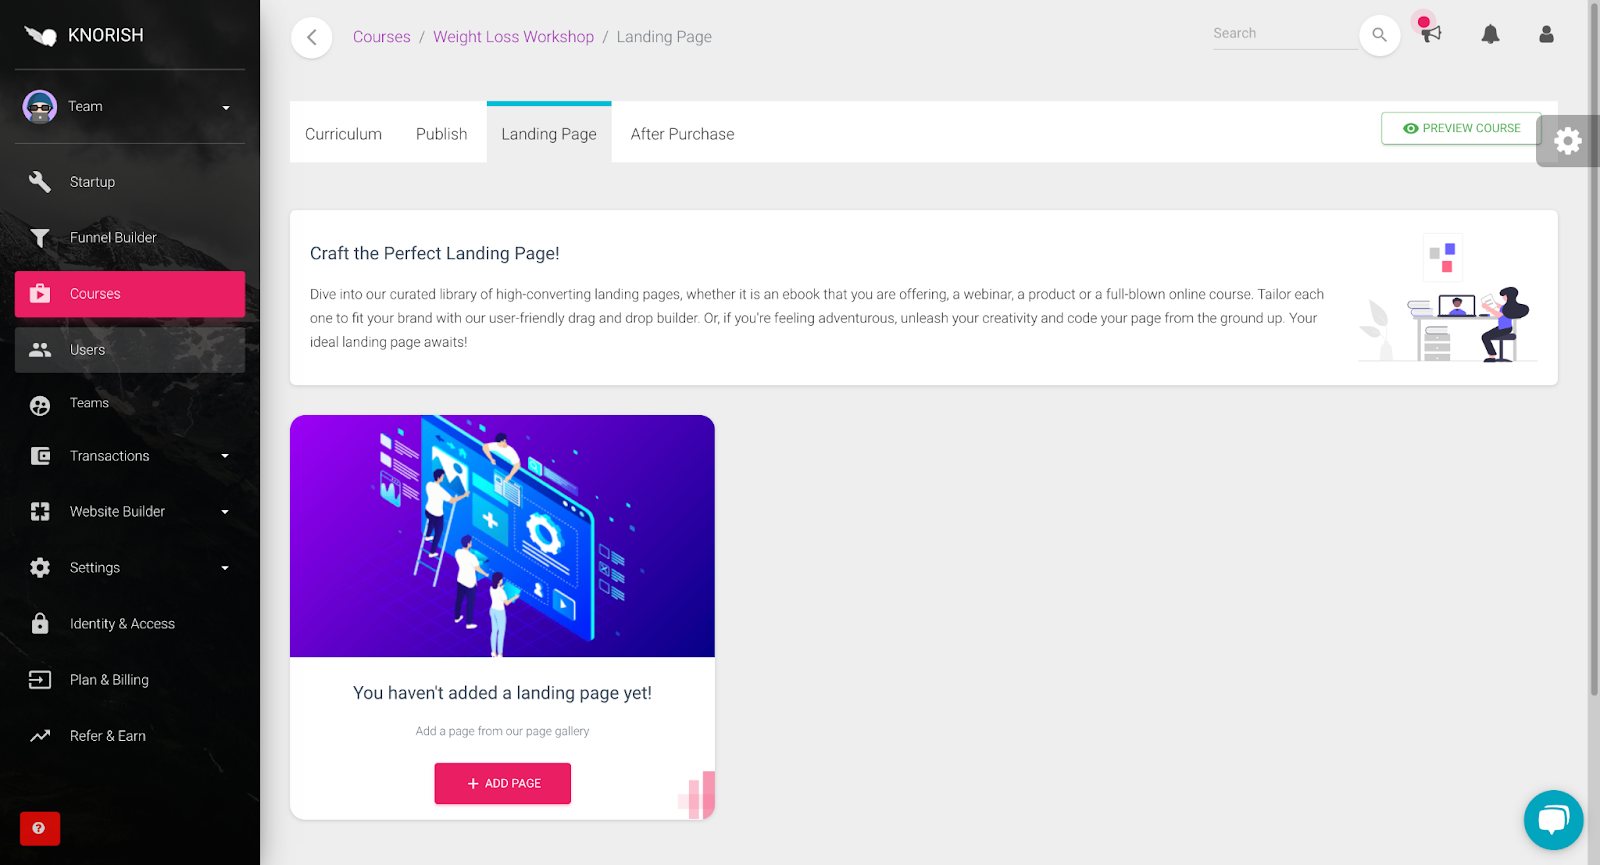
Here’s how to design a landing page in the new page builder and how to connect a page buttons with the course
Check scheduled live sessions
There are two ways to check all the scheduled live sessions in an account.
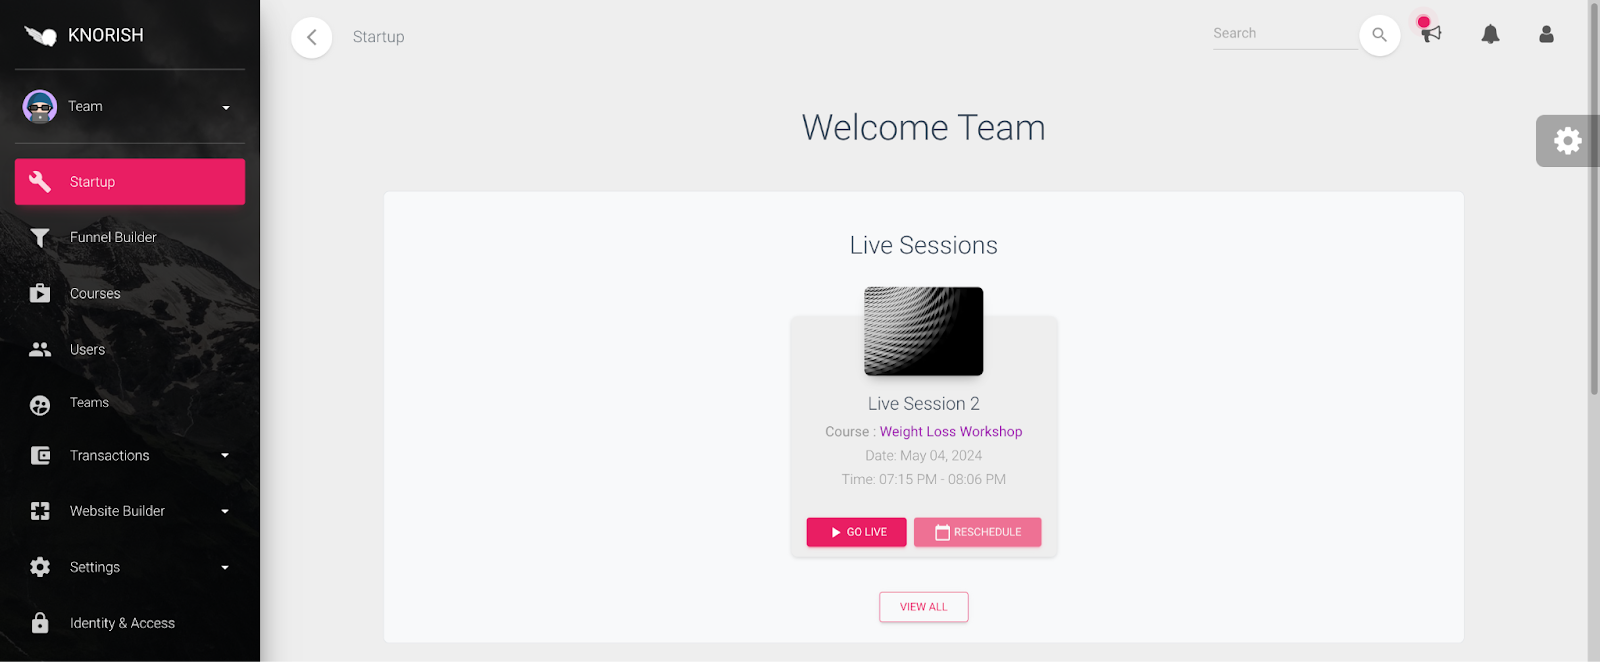
- All upcoming live sessions are displayed on the Startup section of the dashboard of the admins and other users.
- Navigate to the relevant course curriculum to view the schedule of upcoming live sessions within the course.
Learner’s Login Experience
To join a Live session from within the Course delivery screen, a student will simply need to select the Join Live Session button from the user’s home page on dashboard, calendar invite link, or the course curriculum page. In case the session has not yet started, the student will be brought to a page indicating the session has not started yet. Learn more about the student live session login experience here: Live Sessions: Learner’s Login Experience
Recording, Retrieving & Uploading Live Session Videos For Replays
When you go live using Microsoft Teams by Knorish or your integrated Zoom, the sessions can be recorded.
- If you are using Zoom via Integration, your meeting will automatically be recorded in the Cloud. If you wish to make changes, simply stop the recording and start it again by selecting the desired location directly from the Zoom interface.
- Meetings created automatically in Teams by Knorish will be recorded. If you have manually created a meeting using the Teams calendar (meeting, webinar, or town hall), you will have the option to start recording through the Teams interface.
If you don't want to record, you'll need to stop it directly from the Microsoft Teams or Zoom app.
Once downloaded, you can upload the files into the course as a video file or embed via YouTube or Vimeo. Should you need to compress the file to meet the 2GB size limit, refer to how to compress your video file size.
Additionally, you can upload it inside the course and also create a new landing page for the replay, upload the video on Vimeo/ YouTube and drive traffic to that page for more people to watch the replays.
Note:
- Cloud recordings generally take about twice the duration recorded to process, but occasionally may take up to 24 hours due to higher processing loads at the time. For example, an hour-long meeting with only 30 minutes recorded would typically take 30-60 minutes to process.
- Past recordings will be available for up to 120 days on Microsoft Teams by Knorish. For Zoom recordings, it will depend on your storage and plan limits. Post which they are deleted automatically and Knorish will be unable to retrieve them for either of the software.
- Deletion of Live sessions from the Knorish account has no bearing on the Microsoft teams license or your zoom license since the recordings are stored in those platforms.
How to send live session reminder emails to learners?
You can setup 3 reminder emails in total out of which 1 can be setup automatically at the time of creating a live session as shown below.
For sending additional reminders, here’s a quick step by step process
- Access the dashboard
- Click on the course name for the live session
- In the curriculum, head to the live session where emails need to be added
- Click on Content
- Click on Edit
- Click on Edit Session Settings
- Under Create Email Reminders, click on New Email
- Update the Email subject line and body to inform learners of the change
- Under Email Delivery Time, update the time for the email to be scheduled
- Click Save
Edit or cancel a live session and notify learners about changes or cancellations
Before you cancel a live session, ensure to send an update to the registered users about the change of plans. Listed below are the steps to follow.
Here's how to edit a live session
- Access the Dashboard
- Click on Startup
- Review all the live sessions enabled
- Select the one that needs to be rescheduled
- Click on Reschedule
- Update the new date, time or time zone
- Upload a thumbnail if needed
- Click Save and then Next
- Click on I want to add more sections
- Click on Content next to the rescheduled session
- Click on Edit Session Settings
- Under Create Email Reminders, click on New Email
- Update the Email subject line and body to inform learners of the change
- Under Email Delivery Time, update the time for the email to be scheduled
- Click Save
Note: Deleting a live session can create a poor experience for users since they won't receive an automatic cancellation email notification. It is advisable to send a notification email first about it, wait for a few hours or days, and then delete the live session if necessary.
Create temporary password for using Microsoft Teams
Knorish automatically assigns a default password when provisioning your Microsoft Teams license. If you ever forget your Microsoft Teams password, you can generate a temporary password that remains valid for 8 hours. It's important to note that you won't be able to create a permanent password using temporary password. Unfortunately, Microsoft sets restrictions that prevent the use of temporary passwords for an extended period.
If you need assistance in creating a permanent password, please contact support@knorish.com. Once you receive the permanent password, make sure to change it immediately to personalize it and securely store it for future use.