On your Knorish site, your Publisher Dashboard is the first thing you will see when you log in as a Site Admin or Owner. This is where you’ll be able to access and interact with your site - Website Builder, the Course Builder, Student Progress, Site Settings, Analytics, Transactions, Plan & Billing, Identity & Access, etc.
In this article, we’ll quickly cover everything you need to get started with Knorish on your Publisher dashboard.
Overview
Here’s what your Publisher Dashboard looks like:

Its elements include:
- Startup
- Funnel Builder
- Courses
- Users
- Teams
- Transactions
- Website Builder
- Settings
- Identity & Access
- Plan & Billing
- Refer & Earn
In this article, we’ll help you briefly understand how to navigate these elements on your Publisher Dashboard.
Startup

The startup page prompts you to complete actionable basic steps to start creating your online site. Such as the creation of your first course, website building, personalizing your domain name, uploading your custom branding, creating your Terms & Policies document, Adding other functionalities (Integrations for ticket management, analytics, mailing), and connecting you with available Knorish Knowledge Resources to help you further.
Note: A tick mark appears next to each of the completed cards. So, that you start working on the pending steps.
Funnel Builder
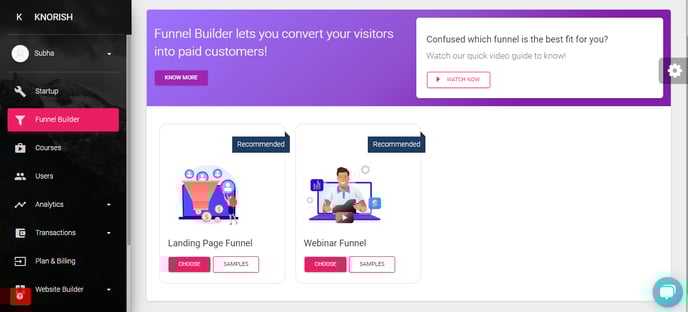
Build automated funnels to grow your business. Use the landing page funnel or the webinar funnel to drive traffic to your landing pages, and get more leads and sales faster than ever with upsells.
Learn more about how to build your funnels: Knorish Funnel Builder
Courses

Clicking on the Course menu on your dashboard opens courses, live sessions, course categories, and course library settings. This section allows you to create or access a course, live sessions, categorize, build and access course libraries accordingly.
Here’s how you create and set up your course or conduct your live sessions with Zoom.
Users

The Users section displays the downloadable list of all the students who have access to your course. You may choose to look them up as per the date range. Should you need it, you can download the list as well (Copy, CSV, Excel, Print format)
You can also read How to check the number of users in a course or all courses.
Teams
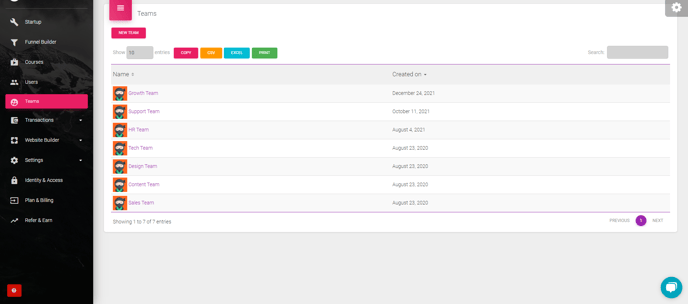
Group your learners as per your needs and add them into teams. Automatically assign courses and content pre-listed in the group. Learn more about how to use this feature here - Teams
Transactions

There are five sub-categories listed under Transactions:
- Earning
- Refunds
- Payout
- GST
- Coupon
This section helps you to access and download the details of the amount (INR/USD) earned, refunds, payouts, GST statements, discount coupons, and more.
Also, read Payouts, bank accounts update, and withdrawing money from your account
Website Builder
Website Builder is where you can build out all of your Site pages like the Home Page, About Page, Contact Us Page, etc.

Here’s how you can access it:
- Go to Dashboard Menu
- Select Website Builder
See: How to install a theme, customize site pages and create your site for more details.
Settings

Settings enable you to change your account settings. It has the following elements :
- Organization: Here, you can update your organization details for billing and legal purposes including the GST Number. In addition, you can white-label your site if you have opted for the Power plan. The option to delete your account too can be found in this section. But, before you delete your Knorish Account Read this.
- Sign up & Login: Helps you to change background image plus enable capturing phone number and other custom fields with every signup if required. Here are the steps to customize your sign-up form.
- Blog Settings: This setting can be accessed under all Plans. Read how you can set up a blog on your Knorish site for reference if you want.
- Notifications: In this section, any new downloadable notifications - system generated or otherwise are displayed here. Here's how you can create a contact form & check for query notifications.
- Spotlight: A spotlight is used for creating announcements/ notifications Or for redirecting the user to another page such as contact us, course page for sales, etc. Here’s how you can customize the Spotlight for your site.
- Contact Message: This section shows any messages from your students along with their details (Subject, Name, Email, Phone, Message, Other data, Received On, Replied To, and Actions).
You’ll be required to integrate Freshdesk. - Email Pipeline: Email Pipeline will show you all the emails sent from the account to users or students. Should you need it, you can export the data in an excel format.
-
Integrations: Here are a couple of Key Integrations available on Knorish :
-
- Cloudflare Custom Domain with SSL Integration
- Paypal Payment Gateway Integration
- Stripe Payment Gateway Integration
- Razorpay Payment Gateway Integration
- Freshdesk Ticket Management Integration
- Facebook Pixel Integration
- Google Tag Manager Integration (BETA)
- Google Analytics Integration
- MailChimp Marketing Email Integration
-
Templates: These are pre-set auto-notification email templates for emails that can are sent based on specific triggers or events. At present, these include:
-
-
- Bundle Renewal Successful
- Bundle Autopay Reminder
- Send Account Invite User Publisher
- Passwordless Email
- Bundle Subscription Canceled
- Course/Bundle Assign Notification
- Drip Content Available
- Email or Phone Not Confirmed
- Send an Email To the Team
- Send an Email To the Student
- Forgot Password Email
- Purchase Successful Customer
- Public Sign Up
- Invoice To Student Download
- Send Identity And Access Invite
- Live Event Email Template
- Live Session Reminder Email Template
- Live Session Cancelation Email Template
- Live Session Custom Email Template
- Bundle Autopay Failure
- Bundle Invoice To Student Download
- Course Expiry Email
- Change Email
- Bundle Purchase Confirmation Customer
- Send Password
- Webinar Funnel Email
-
Here’s how you can customize an automatic email template.
Identity and Access

Identity & Access is a feature that is available in paid plans (Professional & Power). It lets the Admin assign instructor/editing access to other users based on their roles and also enables users to have access to specific sections of the site/dashboard such as only the earning, blog, customer support roles, etc.
Here’s how it works:
- User Roles: Admins, instructors, editors, accounting, customer service & blogging roles
- Enabling Multiple Course Creators on my Knorish Site
So, above is a brief overview of how you can navigate your Publisher’s dashboard on your Knorish site. You’re now all set to start on your digital coaching journey.
Plan & Billing

This section allows you to renew or upgrade your Knorish account and get billing & invoices. You can check out Billing Details and Past Transactions for detailed steps here.
Refer & Earn
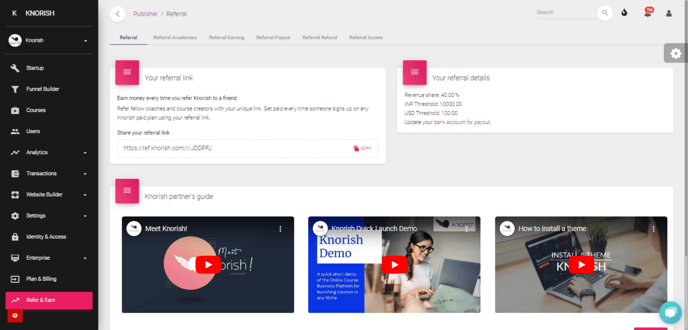
Refer creators to Knorish from your own dashboard. By referring Knorish, you can now earn unlimited commissions. Each time your contact signs up on any of Knorish's paid plans, you get up to 40% commission. There is no upper limit to how much you can earn. You get paid for each successful referral.
Learn how to refer creators to Knorish here: Knorish Referral Program